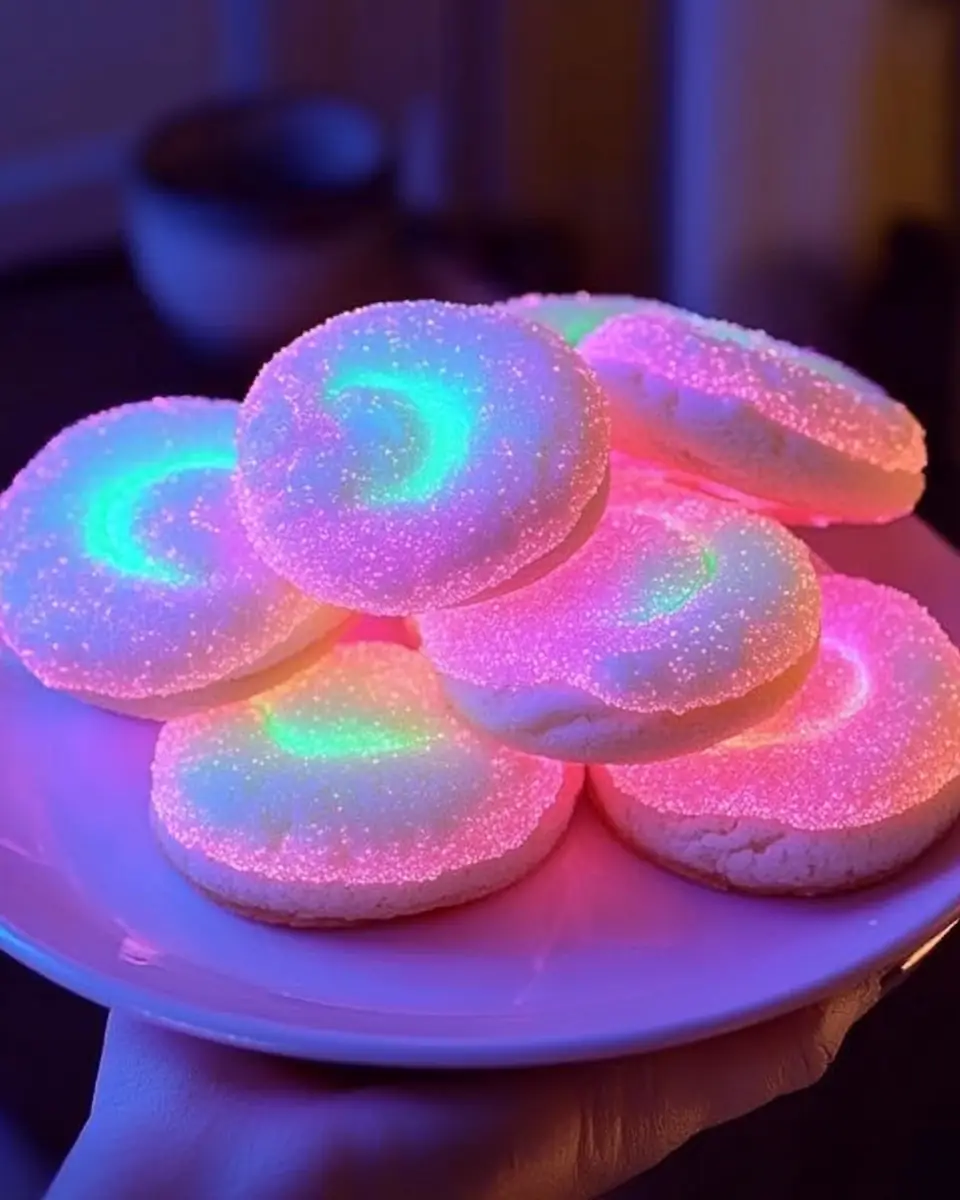
Baking with family is more than just a culinary activity; it’s an opportunity to craft memories, share laughter, and create stories that will be cherished for years to come. One of my most treasured memories is baking Glow-in-the-Dark Cotton Candy Cookies with my kids. Their eyes widened with wonder as these magical cookies emerged from the oven, looking as if they were plucked straight from the pages of a whimsical fairy tale. These cookies are more than a sweet treat—they are a delightful experience that brings families together, perfect for any gathering, from birthday parties to fun weekend projects.
Why You’ll Love This Recipe
Playful and Magical
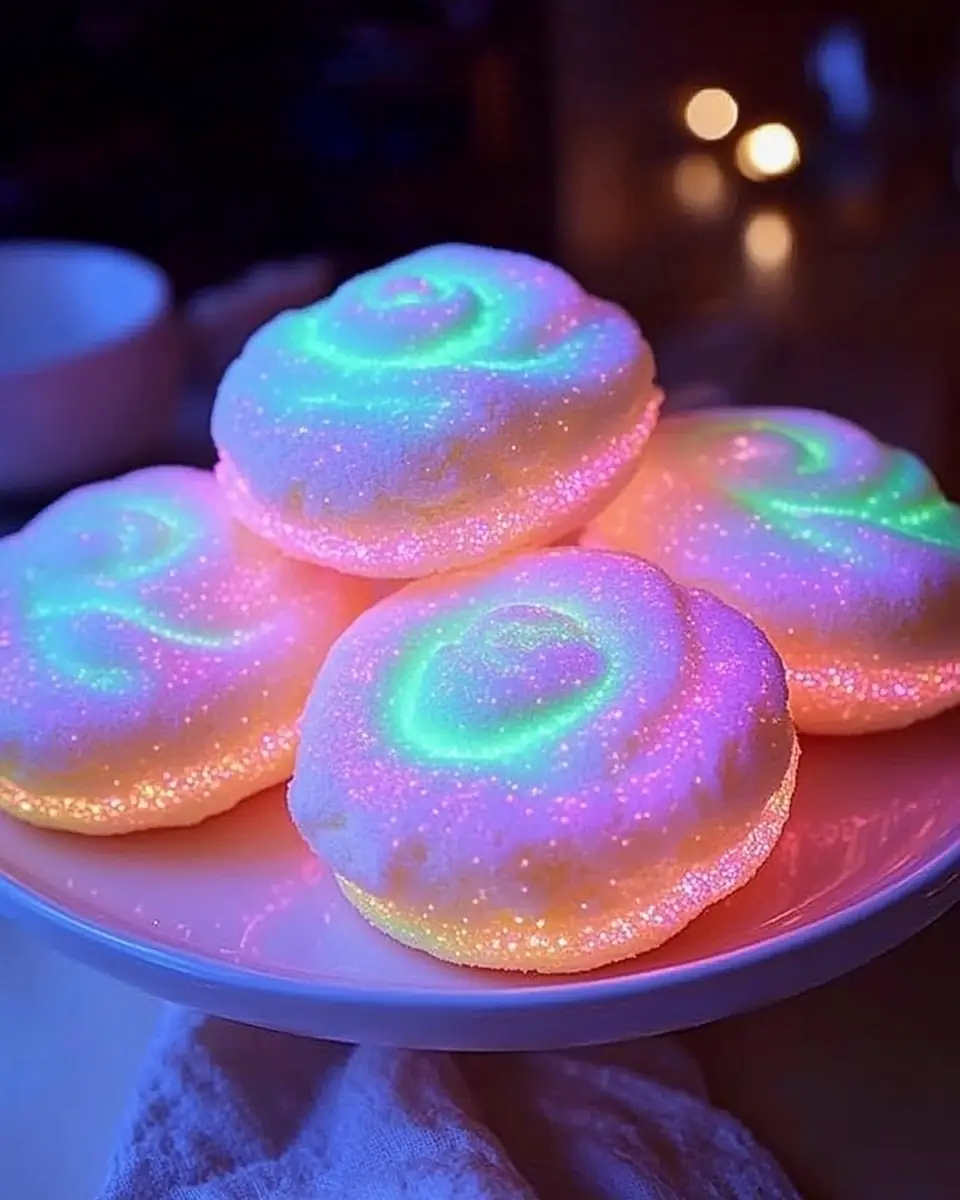
There’s an irresistible charm to these cookies, thanks to their glow-in-the-dark feature. This unique twist turns a simple baking session into a magical experience. Ideal for children and those young at heart, these cookies add a sprinkle of magic to any occasion. Imagine the delight of turning off the lights and watching the cookies glow, creating a moment of awe and excitement for everyone involved.
Simple Ingredients
One of the best aspects of this recipe is its simplicity. You don’t need to scour specialty stores for exotic ingredients. Everything you need can be found in your kitchen pantry or local grocery store. This makes the recipe accessible and stress-free, allowing you to focus on the fun of baking and decorating.
Quick and Easy
With a prep time of just 15 minutes and a cook time of 10 minutes, these cookies are an excellent choice for those who want to whip up a quick yet impressive treat. The straightforward steps ensure that even novice bakers can achieve perfect results, making this a go-to recipe for spontaneous baking sessions.
Family Fun
This recipe invites the whole family to join in the fun. From mixing the dough to adding the food coloring, each step is an opportunity to bond and create together. Kids will especially enjoy choosing their own color combinations and watching their creations come to life in the oven.
Versatile and Creative
Customization is key when it comes to these cookies. You can tailor the colors and toppings to match any theme or event, making them incredibly versatile. Whether you’re hosting a themed party or simply want to experiment with different color palettes, these cookies can adapt to your creative vision.
The Recipe
Ingredients
- 2 ½ cups all-purpose flour: Provides structure and texture.
- 1 teaspoon baking soda: Ensures the cookies rise.
- ½ teaspoon baking powder: Contributes to the perfect spread.
- ½ teaspoon salt: Enhances flavor.
- 1 cup unsalted butter, softened: Adds richness and a tender crumb.
- 1 ½ cups granulated sugar: Sweetens and helps with browning.
- 1 large egg: Binds ingredients and adds moisture.
- 1 teaspoon vanilla extract: Enhances flavor depth.
- ½ teaspoon cotton candy extract: Delivers whimsical flavor.
- 3 tablespoons cotton candy-flavored gelatin powder: Boosts cotton candy flavor.
- Neon food coloring (pink, blue, purple, green): Creates vibrant, eye-catching cookies.
- ½ cup cotton candy, torn into small pieces (for garnish): Adds fun and flair.
- ¼ cup edible glow-in-the-dark sugar (optional): Creates the magical glow effect.
Directions
-
Preheat and Prep: Start by preheating your oven to 350°F (175°C) and lining a baking sheet with parchment paper, which ensures easy removal and cleanup.
-
Mix Dry Ingredients: In a medium bowl, whisk together the flour, baking soda, baking powder, and salt. This step ensures even distribution of the leavening agents, which is crucial for the perfect cookie texture.
-
Cream Butter and Sugar: Using a large mixing bowl, beat the softened butter and granulated sugar together until the mixture is light and fluffy. This should take about 2-3 minutes and is essential for achieving a tender cookie crumb.
-
Add Flavors: Incorporate the egg, vanilla extract, and cotton candy extract into the creamed mixture. Mix until everything is well combined and smooth.
-
Combine Dry and Wet Ingredients: Gradually add the dry mixture to the wet ingredients, stirring until a cohesive dough forms. Be careful not to overmix, as this can lead to tough cookies.
-
Color the Dough: Divide the dough into four equal portions, then tint each portion with a different neon food coloring. This is where the magic begins as the colors come to life.
-
Create the Marbled Effect: Lightly knead the colored dough portions together to create a marbled effect. Avoid overmixing to maintain distinct color swirls.
-
Shape the Cookies: Roll the dough into 1-inch balls, placing them on the prepared baking sheet with about 2 inches of space between each one to allow for spreading.
-
Bake: Bake the cookies for 8-10 minutes, or until the edges are set but the centers remain soft. This ensures a chewy interior with a slightly crisp edge.
-
Garnish: Once out of the oven, immediately sprinkle the hot cookies with edible glow-in-the-dark sugar and small pieces of cotton candy. The heat will help the toppings adhere to the cookies.
-
Cool: Allow the cookies to cool on the baking sheet for 5 minutes before transferring them to a wire rack to cool completely. This step is crucial for setting the structure of the cookie.
Kitchen Tools You’ll Need
- Mixing Bowls: Essential for separating wet and dry ingredients.
- Electric Mixer: Helps achieve the perfect fluffy consistency when creaming butter and sugar.
- Parchment Paper: Provides a non-stick surface for baking.
- Baking Sheet: Ensures even baking.
- Wire Rack: Allows cookies to cool thoroughly, critical for texture.
The Benefits of Each Ingredient
Each ingredient in this recipe has a purpose, contributing to the overall flavor and texture of the cookies. Understanding these roles can help you appreciate why each component is necessary:
- All-Purpose Flour: Provides the foundational structure, ensuring the cookies hold their shape.
- Baking Soda and Baking Powder: These leavening agents are crucial for the cookies to rise properly, delivering the perfect soft yet chewy texture.
- Butter: Its fat content gives the cookies a rich flavor and tender texture, making each bite melt in your mouth.
- Granulated Sugar: Beyond sweetness, sugar helps achieve a beautiful golden-brown color during baking.
- Cotton Candy Extract and Gelatin Powder: These ingredients provide the whimsical flavor that sets these cookies apart from the traditional.
- Neon Food Coloring: Offers the vibrant hues that make these cookies visually appealing and fun.
- Cotton Candy and Glow-in-the-Dark Sugar: These final touches make the cookies magical and party-ready.
What to Serve With This Dish
These cookies are a delightful treat on their own, but pairing them with a glass of cold milk or a cup of hot cocoa enhances their comforting qualities. For themed parties, consider serving them alongside other whimsical desserts like Unicorn Cupcakes or a Rainbow Sprinkle Cake. This creates a colorful dessert table that entices both the eyes and the taste buds.
Storage & Leftover Tips
- Storing: Place your cookies in an airtight container at room temperature for up to a week. For extended freshness, consider freezing them. Just ensure they are completely cooled before placing them in a freezer-safe bag or container.
- Leftovers: If you have leftovers (a rare occurrence), you can refresh them by briefly microwaving them. This brings back the fresh-from-the-oven softness and warmth.
The Joy of Baking Together
Baking these Glow-in-the-Dark Cotton Candy Cookies is more than just the act of creating a delicious treat. It’s about the joy of spending time together, laughing, and making memories in the kitchen. Every moment, from mixing the dough to watching the cookies bake, is an opportunity to bond and create something special. These cookies aren’t just a recipe—they’re a token of love and a memory in the making. I hope this recipe brings as much joy to your family as it has to mine. Happy baking!
Glow-in-the-Dark Cotton Candy Cookies
Ingredients
Equipment
Method
- Preheat oven to 350°F (175°C) and line a baking sheet with parchment paper.
- In a medium bowl, whisk together flour, baking soda, baking powder, and salt. Set aside.
- In a large mixing bowl, beat butter and sugar together until light and fluffy.
- Add the egg, vanilla extract, and cotton candy extract, mixing until well combined.
- Gradually add the dry ingredients into the wet ingredients, stirring until a dough forms.
- Divide the dough into four equal portions and tint each portion with a different neon food coloring.
- Lightly knead the colors together to create a marbled effect, but do not overmix.
- Roll dough into 1-inch balls and place them onto the prepared baking sheet, spacing them 2 inches apart.
- Bake for 8-10 minutes or until edges are set but centers are soft.
- Remove from the oven and immediately sprinkle edible glow-in-the-dark sugar and small pieces of cotton candy on top.
- Let cookies cool on the baking sheet for 5 minutes before transferring to a wire rack to cool completely.