
Crusty Mini Baguettes are a delightful addition to any meal, offering both a satisfying crunch on the outside and a soft, airy interior. As someone who loves creating comfort food that’s perfect for family gatherings, I find these mini baguettes to be an absolute must-have. They’re easy to make, require simple ingredients, and can be customized to suit any taste with a touch of herbs or cheese. Whether you’re making them as a side dish or using them as a base for your favorite sandwiches, these mini baguettes will quickly become a staple in your bread-baking repertoire.
Baking bread at home has become increasingly popular, and for good reason. There’s something inherently therapeutic about the process. Kneading the dough, shaping it, and watching it rise can be a meditative experience, offering a break from the hustle and bustle of daily life. The aroma that fills your home as the baguettes bake is irresistible, making the anticipation of the first bite even more enjoyable. To get inspired, you can explore King Arthur Baking’s bread techniques or dive into the art of French baking at BBC Good Food’s guide.
Table of Contents
Why You’ll Love This Dish
These Crusty Mini Baguettes are a home cook’s dream. First and foremost, they’re straightforward to make, even for beginners. With just a handful of pantry staples, you can create bakery-quality bread right in your kitchen. The satisfaction of pulling out a tray of perfectly golden, crusty baguettes from your oven is unmatched. Plus, the versatility of these baguettes means you can serve them with soups, salads, or as the star of a sandwich bar. Not to mention, the process of baking bread is a fantastic way to engage kids in the kitchen, making it a perfect family activity.
The Recipe
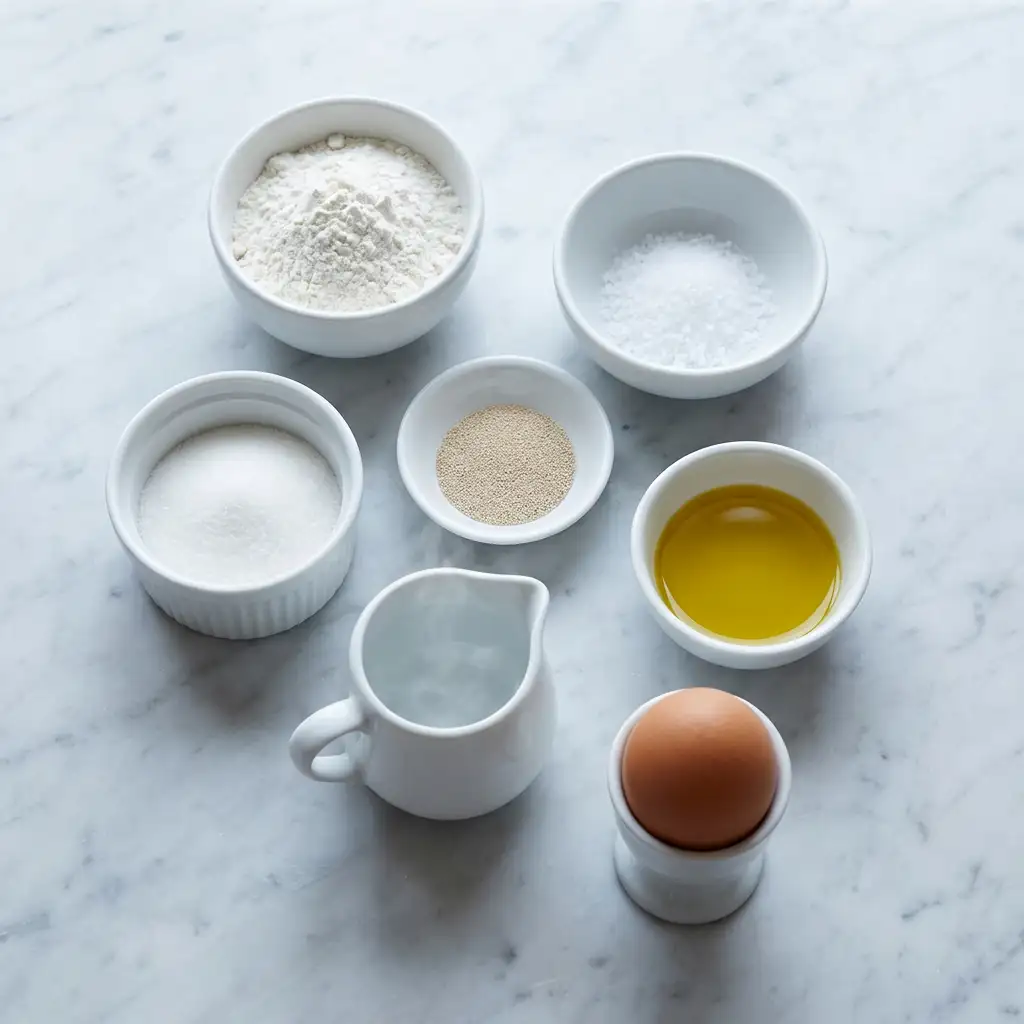
For the Baguette Dough:
| Amount | Ingredient | Notes |
|---|---|---|
| 280 g | all-purpose flour | use bread flour for a chewier texture |
| 1 tsp | salt | — |
| 1 tsp | sugar | — |
| 1 packet | active dry yeast | equivalent to 2 1/4 teaspoons |
| 180 ml | warm water | about 110°F/43°C |
| 1 tbsp | olive oil | replace with melted butter for richness |
| 1 | egg | optional, for egg wash; alternatives available |
- In a small bowl, combine warm water, sugar, and yeast. Let sit for 5–10 minutes until the mixture becomes frothy. This is a good sign that your yeast is active and ready to do its job.
- In a large bowl, whisk the flour and salt together. Add the frothy yeast mixture and olive oil. Stir until a shaggy dough forms. You might find it helpful to use your hands to bring the dough together.
- Transfer the dough to a floured surface and knead for 8–10 minutes until it becomes smooth and elastic. If the dough feels sticky, sprinkle a small amount of flour onto the surface.
- Place the kneaded dough into a greased bowl, cover it with a towel, and let it rise in a warm place for about 1 hour, or until it has doubled in size.
- Once risen, punch down the dough and divide it into 4–6 equal pieces. Shape each piece into a mini baguette about 6 inches long and place them on a parchment-lined baking sheet.
- Cover the shaped baguettes loosely and allow them to rise for another 30 minutes. During this time, preheat your oven to 425°F (220°C).
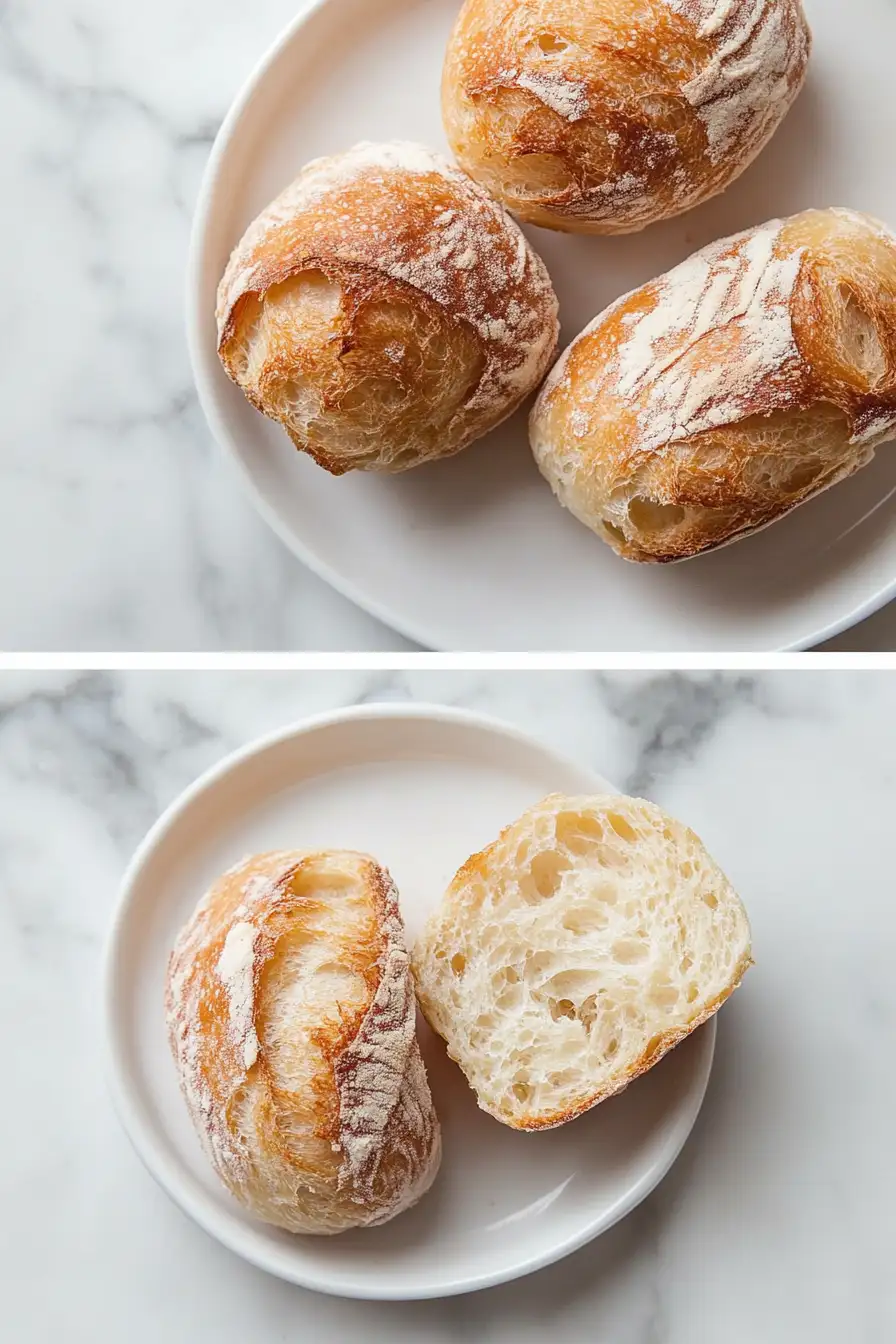
- If desired, beat the egg with a tablespoon of water and brush it over the baguettes. Score each loaf with 2–3 diagonal slashes using a sharp knife for that classic baguette look.
- Bake the baguettes by placing a pan of hot water on the lower oven rack to create steam. Bake for 15–18 minutes until they are golden brown and have a crisp crust.
- Allow the baguettes to cool on a wire rack before serving. This step ensures the crust remains perfectly crunchy.
Tips for Success
While the recipe is simple, a few tips can help ensure your baguettes turn out perfectly every time. First, make sure your yeast is fresh. Yeast that’s past its expiration date may not activate properly, affecting the rise of your dough. The temperature of the water is also crucial; it should be warm but not hot to the touch. This ensures the yeast activates without getting killed by excessive heat. When kneading, patience is key. Proper kneading develops the gluten in the dough, which gives the baguettes their characteristic structure and chewiness.
Kitchen Tools You’ll Need
| Tool | Why you need it |
|---|---|
| Baking Sheet | Essential for baking the baguettes |
| Parchment Paper | Prevents sticking and ensures even baking |
| Large Bowl | For mixing and kneading the dough |
| Sharp Knife | Scoring the dough helps with expansion |
| Wire Rack | Allows the baguettes to cool evenly |
Additional Tools to Consider
Depending on your kitchen setup, you might find a few additional tools helpful. A stand mixer with a dough hook can save time and effort during kneading, especially if you plan to make these often. A dough scraper is handy for working with sticky dough and helps in dividing the dough into equal portions. If you’re aiming for professional presentation, consider using a baguette pan, which helps maintain the shape during baking.
The Benefits of Each Ingredient
| Ingredient | What it does here |
|---|---|
| All-purpose flour | Forms the structure of the baguette |
| Salt | Enhances flavor |
| Sugar | Feeds the yeast and adds slight sweetness |
| Active dry yeast | Leavens the dough, making it rise |
| Warm water | Activates the yeast and hydrates the flour |
| Olive oil | Adds moisture and flavor to the dough |
| Egg | Provides a golden crust when used as a wash |
Ingredient Variations
While the classic recipe is delicious on its own, there are numerous ways to tweak the ingredients for different flavors and textures. For a heartier loaf, substitute half of the all-purpose flour with whole wheat flour. Add a teaspoon of dried herbs like rosemary or thyme for an aromatic twist. If you’re feeling adventurous, mix in a handful of shredded cheese or chopped olives into the dough before shaping for a savory surprise.
What to Serve With This Dish
| Idea | Why it pairs well |
|---|---|
| Tomato Soup | Complements the crunchy texture of the baguette |
| Cheese Platter | Offers a variety of flavors to enjoy together |
| Salad | A light and fresh contrast to the bread |
| Charcuterie Board | Elevates the dining experience with meats |
More Serving Suggestions
Crusty Mini Baguettes are incredibly versatile, lending themselves to a multitude of dishes. Try serving them with a rich beef stew for a comforting meal, or slice them for crostini topped with fresh tomatoes, basil, and mozzarella. They’re also perfect for breakfast, lightly toasted and spread with butter and jam. For a gourmet touch, consider using them as the base for bruschetta, topped with a mixture of diced tomatoes, garlic, basil, and a drizzle of balsamic glaze.
Storage & Leftover Tips
| Method | How long | Tip |
|---|---|---|
| Room Temperature | 2 days | Store in a bread bag or wrap in foil |
| Freezing | 1 month | Wrap individually and freeze for later |
| Reheating | — | Refresh in a 350°F oven for 5-7 minutes |
Keeping Your Baguettes Fresh
To maintain the crusty exterior, avoid storing your baguettes in plastic, which can make them soggy. If freezing, ensure they are completely cooled before wrapping to prevent ice crystals from forming. When ready to enjoy, a quick stint in the oven will revive their crispy texture. If you find yourself with stale baguettes, don’t worry—they make excellent croutons or breadcrumbs. Simply cube and toast them for salads or grind them for use in meatballs or as a topping for casseroles.
These Crusty Mini Baguettes are a wonderful way to bring the family together, whether you’re baking them for a special occasion or just because. They offer a comforting, homemade touch to any meal, and the process of making them from scratch is both rewarding and fun. Sharing them with loved ones not only fills the belly but also the heart, turning even the simplest meal into a cherished gathering.
FAQs About Crusty Mini Baguettes
Can I make these baguettes gluten-free?
Yes, you can substitute the all-purpose flour with a gluten-free flour blend, but the texture may vary slightly. Be sure to use a blend designed for yeast breads for best results.
How should I store the baguettes to keep them fresh?
Store the baguettes at room temperature in a bread bag or wrapped in foil. For longer storage, wrap them individually and freeze. Reheat in the oven before serving to restore their crusty texture.
Can I prepare the dough ahead of time?
Absolutely! You can prepare the dough up to the first rise, then punch it down and refrigerate it overnight. Let it come to room temperature before shaping and baking the next day.

Crusty Mini Baguettes
Ingredients
Equipment
Method
- In a small bowl, combine warm water, sugar, and yeast. Let sit for 5–10 minutes until frothy.
- In a large bowl, whisk together the flour and salt. Add the yeast mixture and olive oil. Stir until a shaggy dough forms.
- Transfer the dough to a floured surface. Knead for 8–10 minutes until smooth and elastic.
- Place the dough in a greased bowl. Cover with a towel and let rise in a warm place for 1 hour, or until doubled in size.
- Punch down the dough and divide it into 4–6 equal pieces. Shape each into a mini baguette about 6 inches long. Place on a parchment-lined baking sheet.
- Cover the shaped baguettes loosely and let them rise for 30 minutes. Meanwhile, preheat the oven to 425°F (220°C).
- If using, beat the egg with 1 tablespoon of water and brush it over the baguettes. Use a sharp knife to score each loaf with 2–3 diagonal slashes.
- Place a pan of hot water on the lower oven rack (for steam). Bake the baguettes for 15–18 minutes until golden brown and crisp.
- Cool on a wire rack before serving. This allows the crust to firm up perfectly.