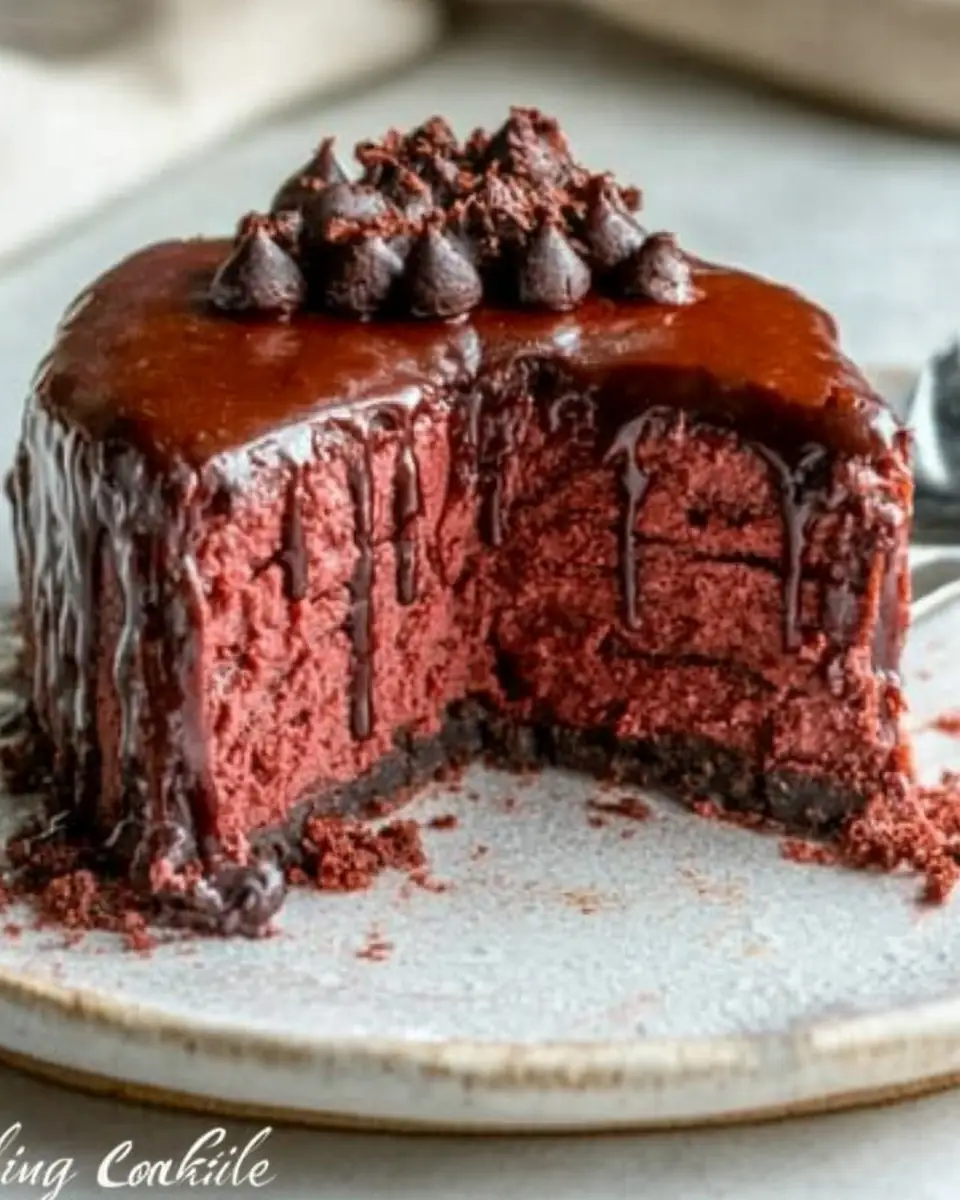
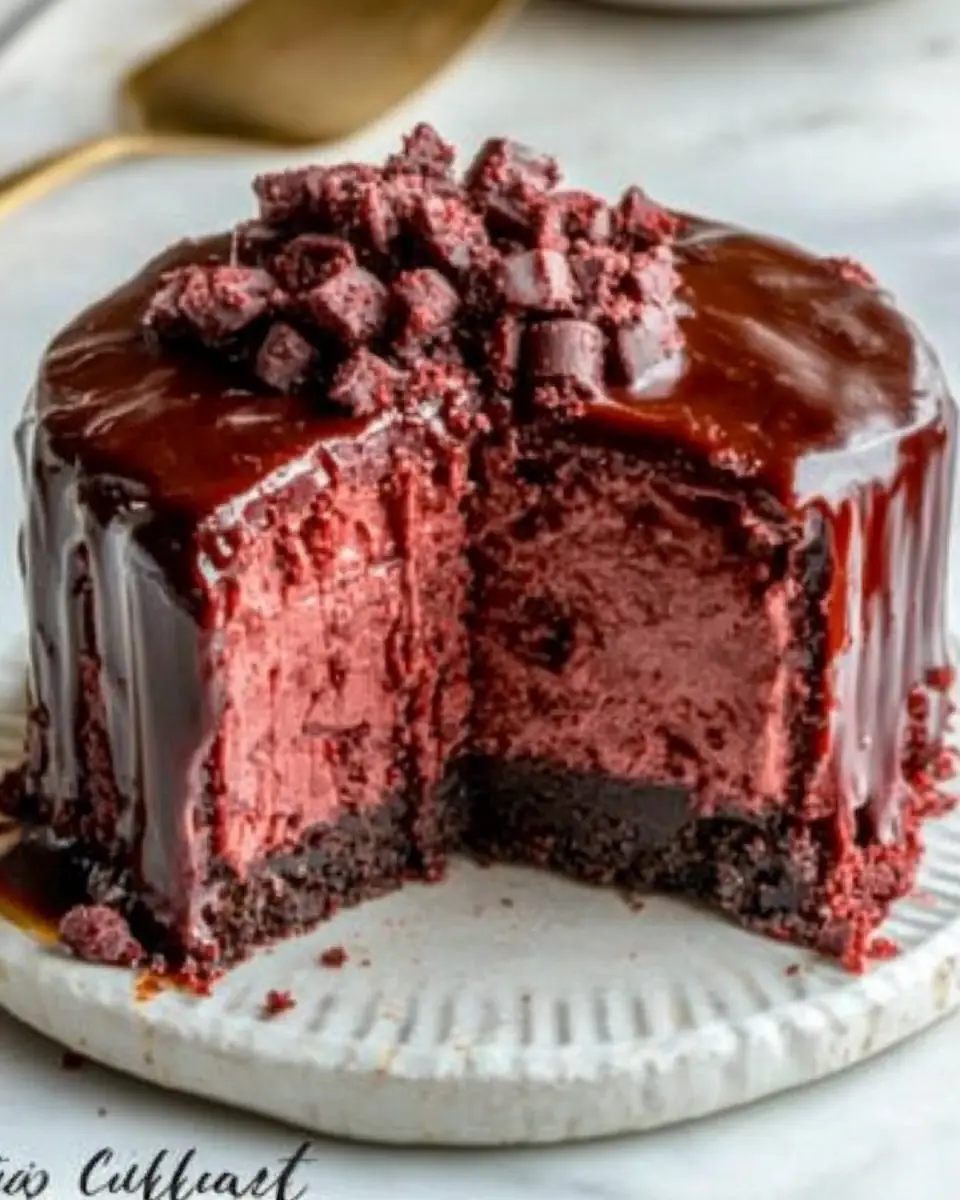
A Love Letter to Red Velvet Cheesecake
Every family has that one dessert that feels like a warm hug after a long day. In our house, that dessert is undoubtedly my Red Velvet Cheesecake. There’s something magical about combining the classic allure of red velvet with the creamy, rich flavors of cheesecake. I first whipped this up on a chilly winter afternoon, hoping to surprise my kids with something special. The moment they took their first bites, their eyes lit up with joy. It was then I knew this Red Velvet Cheesecake was more than just a dessert—it was a memory in the making, bringing us closer with each slice.
Why You’ll Love This Recipe
Here’s why I think you’ll fall head over heels for this Red Velvet Cheesecake recipe:
- Family Bonding: It’s the perfect excuse to gather everyone in the kitchen. Whether it’s your little ones helping with the mixing or your friends gathering around for a tasting session, this recipe is all about bringing people together. The shared laughter and camaraderie only add to the sensory delight of enjoying the finished product together.
- Comfort Food at Its Best: This cheesecake offers the ultimate comfort with its smooth, creamy texture and the delightful hint of cocoa. It’s a treat that feels like home. The rich flavors envelop you like a cozy blanket, making it perfect for any occasion that calls for a touch of indulgence.
- Accessible Ingredients: You probably have most of these ingredients in your pantry and fridge already, making it convenient to whip up without a grocery run. This accessibility means you can satisfy your sweet tooth whenever the craving hits, without the need for a special shopping trip.
- Foolproof Instructions: Even if you’re a novice baker, you’ll find the steps simple and straightforward, ensuring a successful bake every time. The clear guidance helps demystify the cheesecake-making process, empowering you to create an impressive dessert with ease.
- Less Sugar, More Flavor: Using chocolate liquid stevia keeps the sugar content lower without compromising on taste, making it a guilt-free indulgence. This health-conscious approach allows you to enjoy your dessert with a clear conscience, knowing you’re making a smarter choice.
The Recipe
Ingredients
- 8 ounces cream cheese, softened
- 2 large eggs, room temperature
- 1 egg yolk
- 1/2 teaspoon vanilla extract
- 2 teaspoons Chocolate liquid stevia
- Pinch of salt
- Natural red food coloring
- 1/3 cup unsweetened cocoa powder
- 1/2 cup sour cream
Optional Chocolate Sauce: – 3 ounces sugar-free chocolate chips, melted with 2 Tbsp. unsalted butter
Instructions
- Preheat your oven to 325 degrees F. This is key for that perfect bake. The moderate temperature ensures a gentle cooking process that helps avoid overcooking and cracking.
- In a stand mixer, or a large mixing bowl with an electric hand mixer, combine the softened cream cheese, eggs, vanilla, salt, natural food coloring, and chocolate liquid stevia. Blend on medium speed until smooth. The smooth texture of the batter is crucial for achieving the velvety finish characteristic of a good cheesecake.
- Add in the cocoa powder and sour cream, then blend on high speed until everything is well incorporated. This step is where the magic happens, as the cocoa powder infuses the batter with its deep, chocolatey essence.
- Prepare a 4-inch springform pan by greasing it or lining it with parchment paper. Wrap the bottom with aluminum foil to form a seal. This step is vital for preventing water from seeping into the pan during the water bath, which can ruin the texture of the cheesecake.
- Place the pan into an 8-by-8-inch baking dish and pour hot water into the dish until it’s halfway up the sides of the springform pan. The water bath helps regulate the temperature, ensuring even baking and preventing the cheesecake from drying out.
- Pour the cheesecake filling into the springform pan. Bake for 40-45 minutes. Baking times can vary, so check at 35 minutes if using an electric oven. The cheesecake is done when the edges are set and the center still has a slight jiggle.
- Once baked, remove from the oven and let it cool for 10 minutes. Then, remove from the water bath and refrigerate for 4-6 hours or overnight. This cooling period is crucial for allowing the flavors to meld and the texture to firm up.
- For the optional chocolate sauce, combine the melted chocolate chips and butter. Drizzle over the cheesecake before serving if desired. The sauce adds an extra layer of decadence and visual appeal.
Kitchen Tools You’ll Need
To make this Red Velvet Cheesecake, you’ll need:
- Stand mixer or electric hand mixer: Essential for achieving a silky smooth batter.
- 4-inch springform pan: Allows for easy removal of the cheesecake, preserving its beautiful form.
- 8-by-8-inch baking dish: Serves as the water bath for even baking.
- Aluminum foil: Provides a protective seal to keep water out.
- Parchment paper: Ensures easy release from the pan.
These tools will ensure your cheesecake turns out perfectly every time.
The Benefits of Each Ingredient
- Cream Cheese: The heart of any cheesecake, providing its rich and creamy texture. It’s crucial for achieving that classic cheesecake consistency that’s both dense and smooth. Its mild flavor also serves as a perfect canvas for the other ingredients.
- Eggs: They help set the cheesecake, giving it structure and a smooth finish. The addition of an extra yolk adds richness, making the cheesecake even creamier. Eggs also contribute to the luscious mouthfeel that makes cheesecake so irresistible.
- Vanilla Extract: A small amount adds depth and enhances the flavors, providing a subtle sweetness that complements the cocoa. It acts as a flavor enhancer, bringing out the best in the other ingredients.
- Chocolate Liquid Stevia: Keeps the dessert sweet without the added sugar, making it a healthier choice. It imparts a mild chocolate essence that pairs beautifully with the cocoa powder. This allows you to enjoy the rich flavors without the sugar overload.
- Cocoa Powder: Gives the cheesecake its signature red velvet flavor and a touch of chocolatey goodness. It’s an essential ingredient that balances the tanginess of the cream cheese and sour cream. The cocoa’s complexity adds depth to the flavor profile, making each bite a delight.
- Sour Cream: Adds a slight tanginess, balancing the sweetness and adding moisture. It ensures the cheesecake remains tender and prevents it from drying out. The acidity of the sour cream also helps to enhance the overall flavor.
- Natural Red Food Coloring: Gives the cheesecake its vibrant red hue, making it visually stunning. It’s a nod to traditional red velvet cake, making this dessert as pleasing to the eye as it is to the palate. The visual appeal of the red color makes the cheesecake a showstopper.
What to Serve With This Dish
This cheesecake pairs beautifully with a warm cup of coffee or a glass of milk. For a full family dinner, consider serving this as a dessert following my Classic Bolognese Sauce or Herb-Roasted Chicken. Both dishes are hearty and satisfying, setting the stage for a memorable meal.
For a festive twist, you might serve your Red Velvet Cheesecake with a dollop of whipped cream and a sprinkle of cocoa powder. Fresh berries, such as raspberries or strawberries, also pair wonderfully, adding a pop of color and a hint of tartness that complements the rich cheesecake. The combination of the creamy cheesecake and the juicy berries creates a delightful contrast that enhances the overall experience.
Storage & Leftover Tips
- Refrigerate: Store any leftover cheesecake in the fridge, covered with plastic wrap or in an airtight container, for up to 5 days. This ensures it stays fresh and maintains its creamy texture. Proper storage is key to preserving the cheesecake’s quality and flavor.
- Freeze: For longer storage, wrap individual slices in plastic wrap, then place them in a freezer bag. Freeze for up to 2 months. Thaw in the fridge overnight before serving. Freezing individual slices makes it easy to enjoy a piece whenever a craving strikes. This method allows you to savor the cheesecake over time, without the rush to consume it all at once.
Mastering the Art of Cheesecake
Baking a perfect cheesecake can seem daunting, but with a few tips and tricks, you’ll be an expert in no time. Here’s how to ensure your Red Velvet Cheesecake turns out perfectly every time:
- Room Temperature Ingredients: Use room-temperature cream cheese and eggs. This ensures a smooth batter without lumps, leading to a silky texture in the finished cheesecake. The even incorporation of ingredients is crucial for achieving the desired consistency.
- Don’t Overmix: Mix just until the ingredients are combined. Overmixing can incorporate too much air, causing the cheesecake to rise and crack. Gentle mixing helps maintain a smooth, dense texture.
- Water Bath: The water bath is crucial for even baking. It provides a moist environment that prevents the cheesecake from cracking and ensures it bakes evenly. This technique is a hallmark of successful cheesecake baking, ensuring a flawless finish.
- Patience is Key: Allow the cheesecake to cool gradually. Sudden temperature changes can cause it to crack. After baking, let it cool slightly on the counter before refrigerating. This gradual cooling process helps set the cheesecake properly, preventing structural issues.
The Joy of Baking Together
Baking this Red Velvet Cheesecake is more than just following a recipe—it’s an experience. Involving family members can make the process even more enjoyable. Encourage your kids to help with measuring ingredients or mixing the batter. It’s a wonderful way to teach them basic baking skills while creating lasting memories. The shared experience of baking together fosters a sense of connection and accomplishment.
If you’re hosting a gathering, this cheesecake is a delightful centerpiece. Invite friends over and make an event out of baking and enjoying the cheesecake together. The rich flavors and vibrant colors make it a conversation starter, and sharing the process can be as fulfilling as sharing the dessert itself. The act of creating something delicious together can strengthen bonds and create cherished memories.
Variations to Explore
Once you’ve mastered the basic recipe, don’t hesitate to experiment with variations:
- Nutty Crunch: Add a crushed pecan or walnut crust for added texture and flavor. The nuts provide a delightful contrast to the creamy filling, adding a satisfying crunch with each bite.
- Citrus Twist: Incorporate some orange or lemon zest into the batter for a refreshing citrus note. This addition brightens the flavor profile, offering a zesty counterpoint to the rich, chocolatey base.
- Berry Swirl: Before baking, swirl in some raspberry or strawberry puree for a fruity contrast to the rich, chocolatey base. The vibrant fruit flavors create a dynamic interplay with the cheesecake, enhancing its complexity.
Each variation offers a new taste experience, keeping the recipe fresh and exciting every time you make it. Experimenting with different flavors and textures allows you to customize the cheesecake to suit your preferences and explore new culinary horizons.
Making this Red Velvet Cheesecake is like inviting a little piece of joy into your home. Whether you’re sharing it with family or enjoying a quiet moment to yourself, it’s a dessert that truly feels like a special occasion. I hope you find as much happiness in making and eating this cheesecake as I do. Remember, good food is all about love and connection, and this recipe is a delicious way to celebrate both. Happy baking!
Red Velvet Cheesecake
Ingredients
Equipment
Method
- Preheat oven to 325 degrees F.
- In a stand mixer, or large mixing bowl and electric hand mixer, combine the softened cream cheese, eggs, vanilla, salt, natural food coloring, and sweetener. Blend on medium speed until smooth and well incorporated. Add in the remaining ingredients and blend on high speed until smooth.
- Grease or line a 4-inch springform pan with parchment paper. Wrap the bottom of the pan with aluminum foil to form a seal, and place the pan into an 8-by-8-inch baking dish. Pour hot water into the dish until it’s halfway up the sides of the springform pan.
- Pour the cheesecake filling into the springform pan and bake for 40-45 minutes. Bake time varies with gas and electric ovens. Electric ovens tend to cook quicker than gas so check at 35 minutes then continue baking time until center is set. Remove from the oven and let cake cool for 10 minutes.
- Remove from the water bath and refrigerate 4-6 hours or overnight.
- When ready to serve, combine the melted chocolate and melted butter together in a small bowl and mix until smooth. Drizzle over cheesecake, if desired.