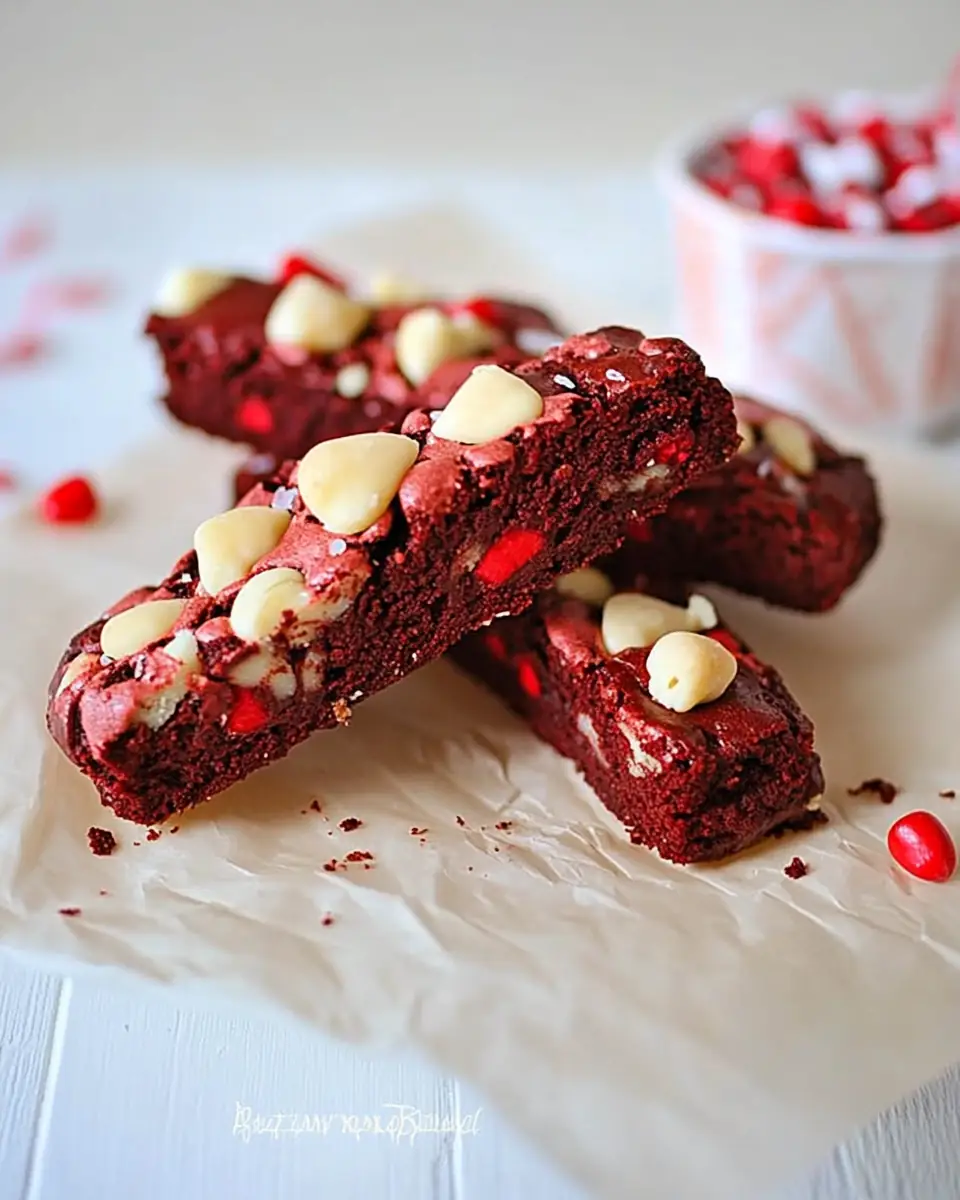
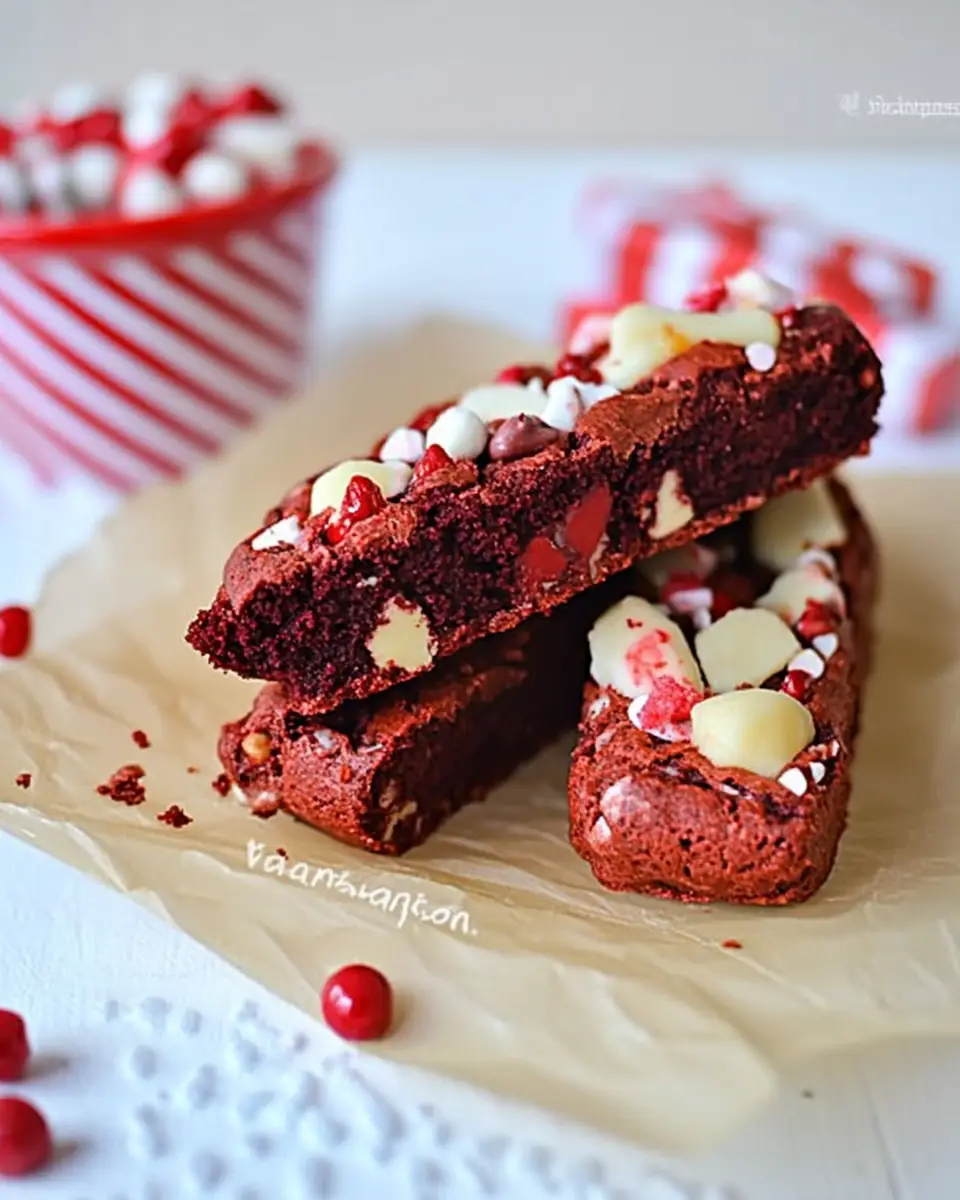
Red Velvet Biscotti: A Delicious Fusion of Tradition and Novelty
Growing up in a household where the kitchen was the heart of the home, I’ve always believed that a good recipe is like a cherished family story. It’s passed down, shared, and sometimes even recreated with a personal touch. One of my favorite stories to tell, through flavors and textures, is that of Red Velvet Biscotti. You might be wondering, “Why biscotti?” Well, this delightful treat bridges the gap between the rich, velvety taste of red velvet cake and the satisfying crunch of biscotti—perfect for those cozy family gatherings where stories and laughter are shared over a cup of coffee or hot cocoa.
There’s something magical about how these biscotti bring everyone together. Picture this: a chilly Sunday afternoon, the scent of cocoa wafting through the air, and the warmth of the oven inviting everyone to gather ’round the kitchen table. These moments remind me of why I love cooking. It’s not merely about the food; it’s about creating memories and traditions that your family will hold dear for years to come. So, let’s dive into this recipe and make some new memories together!
Why You’ll Love This Recipe
- A Unique Twist on a Classic: This Red Velvet Biscotti combines the beloved flavors of red velvet cake with the crisp texture of traditional biscotti, offering a unique and delightful treat.
- Family-Friendly: With its bright color and heart sprinkles, this recipe is not only delicious but also fun to make with kids. It’s a great way to get the whole family involved in the kitchen.
- Perfect for Gifting: These biscotti are not just a treat for your family but make for an excellent homemade gift. Pack them in a pretty box, and you’ve got a delightful present for friends and neighbors.
- Simple Ingredients: Made with everyday ingredients, this recipe doesn’t require a special trip to the store. Chances are, you already have everything you need right in your pantry.
- Versatile Enjoyment: Whether you enjoy them with your morning coffee or as an afternoon snack, these biscotti are a versatile treat that fits any occasion.
The Recipe
Ingredients:
- 2½ cups all-purpose flour
- 2 cups sugar
- 1 cup Dutch-processed cocoa powder
- 2 oz liquid red food color or 2 tbsp gel food color
- 1½ tsp baking powder
- 1/4 tsp salt
- 5 large eggs
- 1½ tsp vanilla extract
- 1 cup white chocolate chips
- ½ cup heart sprinkles
Instructions:
Preheat and Prepare: Start by preheating your oven to 350 degrees Fahrenheit. This ensures your biscotti bake evenly right from the start. Line your baking sheet with parchment paper to prevent sticking—a step that makes cleanup a breeze.
Mix Dry Ingredients: In a large mixer bowl, combine the flour, sugar, cocoa powder, food color, baking powder, and salt. Use the mixer on its slowest setting to gently stir the ingredients together, ensuring everything is well incorporated.
Prepare Wet Ingredients: In a separate small bowl, lightly beat the eggs and vanilla extract with a fork. This helps the vanilla distribute evenly throughout the dough.
Combine Mixtures: Slowly add the egg mixture to the dry ingredients. Mix well until combined. The dough will be sticky but firm, a sign that it’s ready for the next step.
Add Chocolate Chips: Gently fold in the white chocolate chips. These will melt slightly during baking, creating pockets of sweetness in each bite.
Shape the Dough: Divide the dough in half for 2 large loaves or 3 medium-sized ones. On a lightly floured surface, form each log and place them on the prepared baking sheet. Aim for uniform size and shape to ensure even baking.
First Bake: Bake the logs for about 30 minutes or until the tops are set and slightly firm to the touch. The aroma of chocolate and vanilla will fill your kitchen, a precursor to the treat that awaits.
Cool and Slice: Remove the logs from the oven and reduce the temperature to 300 degrees Fahrenheit. Allow the logs to cool for about 15 minutes before slicing them. Use a serrated knife to cut them into slices about ½ to 1 inch wide.
Second Bake: Lay the slices on their sides on the baking sheet. Bake at 300 degrees for 10 minutes, then flip the slices over and bake for an additional 8-10 minutes. This second bake is crucial for achieving the biscotti’s signature crunch.
Cool Completely: Transfer the biscotti to a wire rack to cool completely. This step is essential for them to harden and develop their crunchy texture. Once cool, they’re ready to be decorated or stored.
Kitchen Tools You’ll Need
- Mixer: For effortlessly combining your ingredients. A stand mixer works best, but a handheld mixer can suffice.
- Measuring Cups and Spoons: Accuracy is key for achieving the perfect texture and flavor balance.
- Baking Sheet: Essential for baking your biscotti evenly. A rimmed sheet is recommended to prevent any spills.
- Parchment Paper: Helps prevent sticking and makes cleanup a breeze.
- Wire Rack: Ensures your biscotti cool evenly and maintain their crisp texture.
The Benefits of Each Ingredient
- All-Purpose Flour: Forms the base, providing structure and texture. It’s versatile and easy to work with.
- Sugar: Sweetens the biscotti and aids in browning, adding a slight caramelized flavor.
- Dutch-Processed Cocoa Powder: Offers a rich chocolate flavor and beautiful color, enhancing both taste and appearance.
- Red Food Color: Gives the biscotti their signature red velvet hue, making them visually appealing and perfect for festive occasions.
- Baking Powder: Helps the biscotti rise, ensuring a light, airy texture despite their firmness.
- Salt: Enhances the flavor by balancing the sweetness and enriching the overall taste profile.
- Eggs: Bind the ingredients together and add moisture, crucial for the biscotti’s structure.
- Vanilla Extract: Complements the chocolate, adding depth and warmth to the flavor.
- White Chocolate Chips: Provide a sweet, creamy contrast to the crunchy biscotti, offering delightful bursts of flavor.
- Heart Sprinkles: Add a touch of fun and are perfect for festive occasions or to show someone you care.
What to Serve With This Dish
Red Velvet Biscotti are wonderfully versatile and can be paired with a variety of beverages and accompaniments. Here are some pairing suggestions:
- Coffee or Espresso: The perfect companion to dip your biscotti in, enhancing the chocolate notes.
- Hot Chocolate: A richer option that complements the cocoa in the biscotti.
- Vanilla Ice Cream: Serve a scoop on the side for a delightful dessert, adding a creamy contrast to the biscotti’s crunch.
- Fresh Berries: Strawberries or raspberries add a burst of freshness and a slight tartness that balances the richness.
Storage & Leftover Tips
- Airtight Container: Store biscotti in an airtight container at room temperature to keep them fresh and crunchy for up to two weeks. Ensure they are completely cool before storing to prevent moisture buildup.
- Freezing: For longer storage, freeze the biscotti in a sealed bag for up to three months. Thaw at room temperature before serving to maintain their texture.
- Decorating: If you’re planning to decorate with chocolate drizzle or additional sprinkles, do it just before serving for the best presentation and to maintain their crispness.
Creating Memories with Red Velvet Biscotti
In closing, I hope this Red Velvet Biscotti recipe brings as much joy and warmth to your home as it does to mine. Whether you’re making them for a family gathering, a special occasion, or simply to enjoy with your afternoon coffee, remember that the heart of any recipe lies in the love and care you put into it. Cooking is as much about the journey as it is about the destination; it’s about sharing experiences and creating something beautiful with your hands.
As you bake these biscotti, let the aromas and warmth fill your home, drawing everyone into the kitchen to share in the experience. Whether you’re laughing with children as they sneak chocolate chips from the bowl or reminiscing with a friend over a cup of coffee, these moments are the true essence of cooking.
Exploring the Cultural Fusion
The history of biscotti dates back to the Italian Renaissance, originating in the region of Tuscany. Traditionally known as “cantucci,” these twice-baked cookies were favored for their long shelf life, perfect for long journeys. Meanwhile, red velvet cake has its roots in the southern United States, a symbol of indulgence and celebration. By combining these two beloved treats, Red Velvet Biscotti not only delight the senses but also tell a story of cultural fusion and culinary innovation. This recipe is a testament to how food can transcend borders, bringing together diverse flavors to create something new and delightful.
Tips for Success
- Avoid Overmixing: When combining your ingredients, mix just until everything is incorporated. Overmixing can lead to tough biscotti.
- Uniform Slicing: When slicing the biscotti for the second bake, try to keep slices uniform in thickness for even baking.
- Cooling is Key: Allowing the biscotti to cool completely on a wire rack is crucial for achieving the right texture. Patience pays off in crispiness!
Customizing Your Biscotti
Feel free to make this recipe your own by experimenting with different add-ins or decorations. Consider adding chopped nuts like almonds or pecans for an additional crunch. You can also explore different chocolate varieties, such as dark or milk chocolate chips, to suit your taste preferences. For a festive touch, try drizzling with white or dark chocolate and adding seasonal sprinkles.
The Joy of Baking Together
Baking these biscotti can be a wonderful bonding experience, especially when shared with loved ones. Invite your family or friends to join you in the kitchen, turning the process into a fun and collaborative endeavor. Share stories, laughter, and maybe even a little flour fight as you create these delicious treats together. The memories you make will be as sweet as the biscotti themselves.
Enjoy the process, savor the results, and, most importantly, cherish the moments with those you love. Until next time, happy cooking!
Red Velvet Biscotti
Ingredients
Equipment
Method
- Pre-heat oven to 350 degrees.
- Mix flour, sugar, cocoa, food color, baking powder, & salt in the mixer bowl & turn it on the slowest setting. (stir)
- Combine eggs, & vanilla in small bowl & beat lightly with a fork.
- Add the egg mixture to the flour mixture & mix well until combined. It will be sticky but firm.
- Fold in the white chocolate chips.
- Divide the dough in half for 2 large loaves – I did 3 medium-sized instead.
- On a lightly floured surface, form each log & place on a parchment-lined baking sheet.
- Bake for about 30 minutes or until tops are set.
- Remove from the oven & reduce oven temperature to 300 degrees.
- Allow logs to cool & then slice about ½ – 1 inch wide.
- Lay slices on their side on the baking sheet & bake at 300 for 10 minutes.
- Remove- flip the slices over & bake an additional 8-10 minutes.
- Cool on a wire rack before decorating or placing them in an airtight container for storage.