The Joy of Making Peanut Butter Truffles: A Family Tradition
When I think about the perfect family treat, one that brings everyone around the kitchen table with smiles and eager fingers, I can’t help but think of my Peanut Butter Truffles. These little bites of heaven are more than just a sweet indulgence; they’re a testament to the magic that happens when simple ingredients come together to create something truly special. I remember the first time I made these truffles. It was a rainy Saturday afternoon, and my kids were restless. I wanted to craft something that felt like an adventure in the kitchen but was easy enough for little hands to help. As we rolled the peanut butter balls and dipped them in velvety chocolate, their laughter filled the room, and I knew we had created a new family tradition.
The Emotional Connection to Family Traditions
Creating family traditions through cooking can be a powerful way to connect generations and build lasting memories. With each batch of Peanut Butter Truffles, my family and I are not just making a dessert; we are weaving a tapestry of shared experiences, laughter, and love. Each truffle holds the promise of togetherness and the joy of creating something delicious with our own hands.
Incorporating cooking into family traditions can also instill a sense of pride and accomplishment in children. They learn the value of teamwork, patience, and creativity, all while having fun. This hands-on experience can ignite a lifelong love for cooking, turning the kitchen into a place of discovery and joy.
Why You’ll Love This Recipe
- Simple Ingredients: You won’t need to make any special trips to the store. Chances are, you already have everything you need right in your pantry. This is the kind of recipe that celebrates the beauty of simplicity, where pantry staples transform into something extraordinary.
- Quick and Easy: With just 10 minutes of prep time and 1 minute of cook time, these truffles come together faster than you can imagine. It’s a perfect recipe for busy days when you crave something sweet but don’t have the time for elaborate desserts.
- Family Fun: This recipe is a fantastic way to get the kids involved in the kitchen. They’ll love rolling the dough and dipping the truffles in chocolate. It’s a hands-on activity that encourages creativity and teamwork, fostering a love for cooking in young hearts.
- Deliciously Rich: The combination of creamy peanut butter and rich dark chocolate makes these truffles a decadent treat that’s hard to resist. Each bite is a perfect harmony of flavors and textures, offering a luxurious experience that feels indulgent yet comforting.
- Perfect for Any Occasion: Whether it’s a family gathering, holiday treat, or just because, these truffles are versatile enough to suit any occasion. They make a thoughtful homemade gift, a delightful addition to a dessert table, or a simple treat to enjoy with loved ones.
The Recipe
Ingredients:
- 1/2 cup peanut butter
- 4 tablespoons (60 grams) unsalted butter, softened
- 6 tablespoons (42 grams) powdered sugar
- 1/2 teaspoon vanilla extract
- 1/8 teaspoon flaky salt
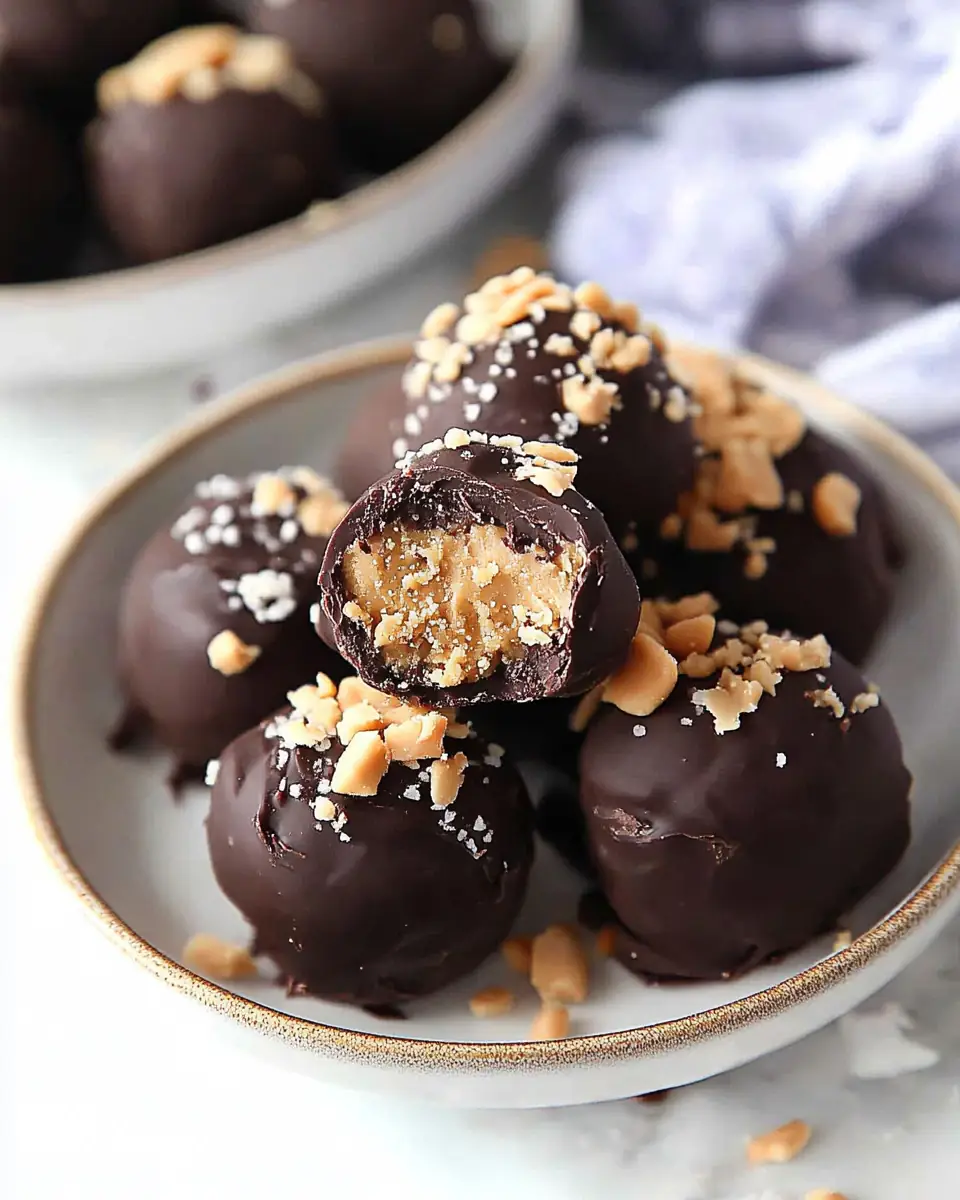
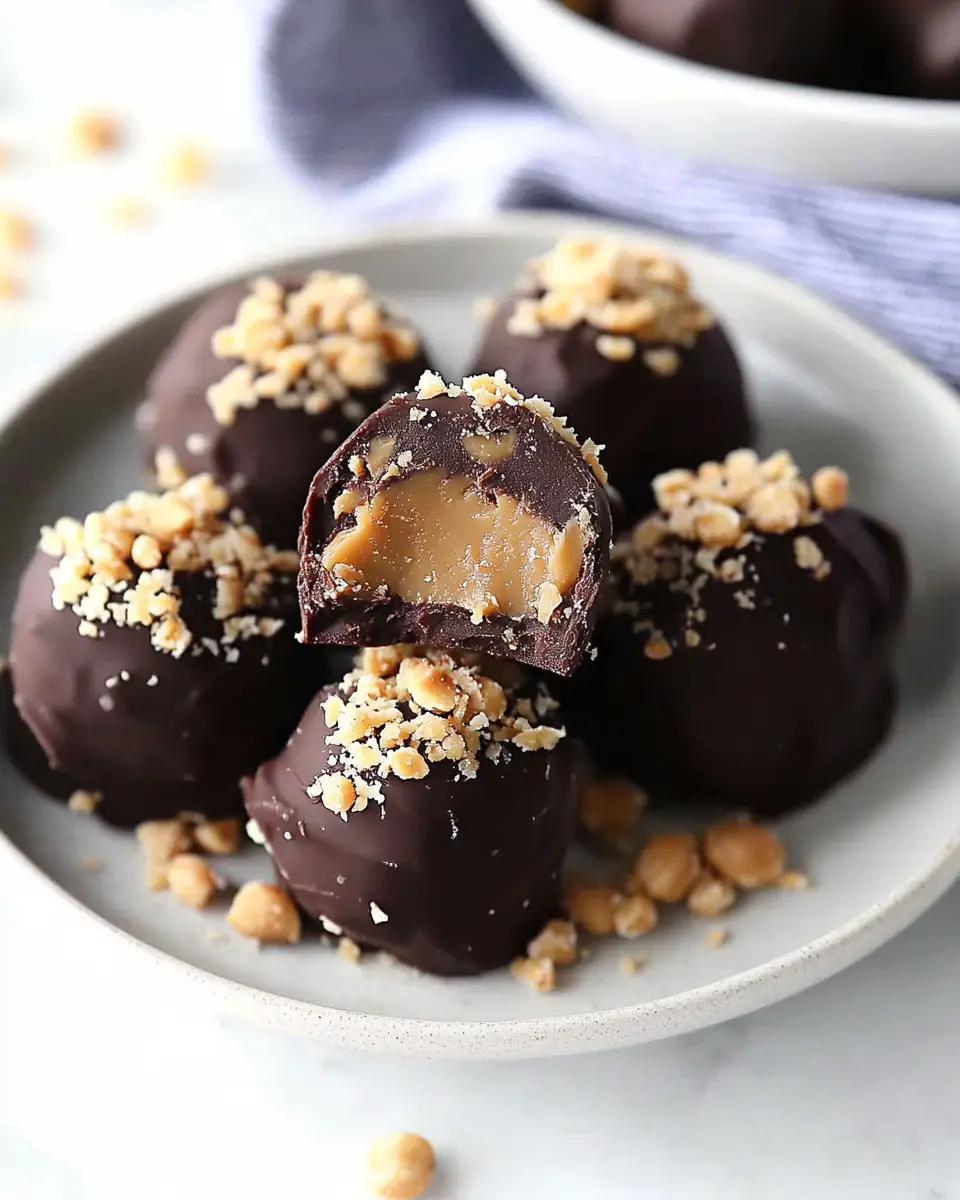
- 4 ounces dark chocolate, chopped
- 1 teaspoon coconut oil
- For garnish: chopped peanuts and flaky sea salt
Directions:
Mix Ingredients: In a mixing bowl, combine the peanut butter, powdered sugar, butter, vanilla, and salt. Use an electric mixer to beat everything together until smooth. If your butter is too soft, the mixture might be a bit wet—just pop it in the freezer for 20 minutes to firm up.
Form Truffles: Scoop out about 10 balls of dough, placing them on a baking sheet lined with wax paper or a silicone mat. Set them in the freezer for another 20 minutes.
Melt Chocolate: While the truffles are chilling, melt the dark chocolate and coconut oil together. You can do this using a double boiler or in the microwave. If using the microwave, heat at 50% power for 30-second intervals, stirring each time until smooth.
Coat Truffles: Remove the truffles from the freezer. Using a fork or a chocolate candy tool, dunk each truffle into the melted chocolate, quickly roll to coat, and lift to drain the excess. Let the excess chocolate drip off between the fork tines or from the candy tool.
Set and Serve: Place the truffles in the fridge to set for at least 5 minutes. These treats are still soft even when chilled, thanks to their rich, creamy texture.
Kitchen Tools You’ll Need
- Electric Mixer: For a smooth, creamy dough. The mixer helps ensure the ingredients are well-incorporated, creating a consistent texture that’s key to the perfect truffle.
- Mixing Bowls: Preferably one medium-sized for mixing and one small for melting chocolate. This setup makes the process more efficient and ensures you have enough space for each step.
- Baking Sheet: Lined with wax paper or a silicone mat for easy cleanup. A lined sheet prevents sticking and makes transferring the truffles a breeze.
- Microwave or Double Boiler: For melting chocolate without burning. Choosing the right method helps maintain the chocolate’s quality and ensures a smooth coating.
- Fork or Chocolate Candy Tool: To coat the truffles in chocolate with ease. These tools allow for a more delicate touch, ensuring each truffle is evenly coated without excess chocolate.
The Benefits of Each Ingredient
- Peanut Butter: It’s the star of the show, offering a creamy texture and nutty flavor that’s both comforting and satisfying. Peanut butter is rich in protein and healthy fats, making it a wholesome choice for indulgence.
- Unsalted Butter: Adds richness and helps bind the mixture together. Butter contributes to the smooth texture and enhances the overall flavor profile.
- Powdered Sugar: Sweetens the truffles without making them grainy. Its fine texture ensures a smooth mixture, perfectly balancing the peanut butter’s savory notes.
- Vanilla Extract: Enhances all the flavors with its warm, inviting aroma. A touch of vanilla elevates the truffles, adding depth and complexity to the taste.
- Flaky Salt: Provides a touch of contrast to the sweetness, elevating the overall flavor profile. A sprinkle of salt enhances the chocolate’s richness and complements the peanut butter’s nuttiness.
- Dark Chocolate: Its rich, slightly bitter flavor balances the sweetness of the filling. Dark chocolate is not only delicious but also packed with antioxidants, making it a healthier choice compared to milk chocolate.
- Coconut Oil: Helps the chocolate set with a shiny finish. It adds a subtle hint of coconut flavor and aids in achieving a smooth, glossy coating.
Enhancing the Truffle Experience: Variations and Tips
While the classic peanut butter and chocolate combination is undeniably delightful, you can elevate your truffles by experimenting with various flavors and textures. Here are some ideas to inspire your next truffle-making session:
Flavor Variations
Nutty Infusion: Swap out the peanut butter for almond or cashew butter for a different nutty profile. Each type of nut butter offers a unique taste and texture, allowing you to customize the truffles to your liking.
Spiced Delight: Add a pinch of cinnamon or cayenne pepper to the peanut butter mixture for a warm, spicy kick. These spices pair beautifully with chocolate, adding a layer of complexity to each bite.
Sweet and Salty: Incorporate crushed pretzels or a sprinkle of sea salt into the chocolate coating for a crunchy texture and a delightful contrast of flavors.
Fruit Fusion: Mix in some dried fruit pieces, such as cranberries or cherries, into the peanut butter mixture. The tartness of the fruit complements the sweetness of the truffles beautifully.
Presentation Tips
Decorative Toppings: After coating the truffles in chocolate, garnish them with a variety of toppings. Consider using chopped nuts, shredded coconut, or colorful sprinkles to add visual appeal and texture.
Themed Decorations: Customize your truffles for holidays or special occasions by using themed sprinkles or edible glitter. This adds a festive touch and makes them perfect for gifting.
Elegant Finishing Touch: Drizzle melted white chocolate over the dark chocolate-coated truffles for a sophisticated look. The contrasting colors and flavors provide a beautiful and tasty finish.
What to Serve With This Dish
These Peanut Butter Truffles are versatile enough to be paired with a variety of treats. For a cozy family night, enjoy them with a cup of homemade hot cocoa. The warmth and creaminess of cocoa perfectly complement the truffles’ rich flavors, creating a comforting experience.
If you’re hosting a gathering, serve them alongside a platter of fresh fruits and nuts. The fresh, juicy fruits add a refreshing contrast, while the nuts enhance the truffles’ nutty essence, creating a balanced and delightful spread.
For an adult get-together, pair these truffles with a light, fruity white wine. The wine’s crispness and subtle sweetness provide a sophisticated contrast to the truffles’ decadence, making it a perfect pairing for a refined palate.
For more delightful dessert ideas, you might also love my Chocolate Lava Cake and Classic Brownie Recipe — both are sure to be family favorites!
Storage & Leftover Tips
Store these truffles in an airtight container in the refrigerator for up to a week. Keeping them chilled maintains their shape and texture, ensuring they taste just as delicious as when freshly made.
If you want to keep them longer, they freeze beautifully. Just place them in a freezer-safe container, separating layers with wax paper, and they’ll keep for up to three months. When you’re ready to enjoy them, simply let them thaw in the fridge for a few hours, allowing them to return to their creamy, dreamy state.
The Joy of Sharing
There’s something special about sharing homemade treats with friends and family. These Peanut Butter Truffles are more than just a dessert—they’re a symbol of love and thoughtfulness. Whether you’re gifting them to a friend, bringing them to a potluck, or simply enjoying them with your family, these truffles have a way of bringing people together.
I hope you find as much joy in making these Peanut Butter Truffles as my family and I do. They’re more than just a treat; they’re a reminder of the simple pleasure of creating something wonderful with those you love. Whether you’re sharing them with family, friends, or simply treating yourself, I’m sure they’ll quickly become a cherished recipe in your collection. Happy cooking!
Peanut Butter Truffles
Ingredients
Equipment
Method
- In a mixing bowl, add the peanut butter, powdered sugar, butter, vanilla, and salt.
- Use an electric mixer to beat the mixture together. If the butter is too soft, freeze the mixture for 20 minutes before proceeding.
- Scoop out 10 balls of dough and place them on a small baking sheet lined with wax paper or a silicone mat.
- Place the peanut butter balls in the freezer for 20 minutes.
- While the truffles are freezing, melt the chocolate and coconut oil together using a double boiler or microwave until smooth.
- Remove the balls from the freezer. Use a fork or candy tool to dunk each truffle in the chocolate, then let excess chocolate drain.
- Place the truffles in the fridge to set for at least 5 minutes before serving.