
Table of Contents
Baked Ham & Cheese Hawaiian Roll Sliders
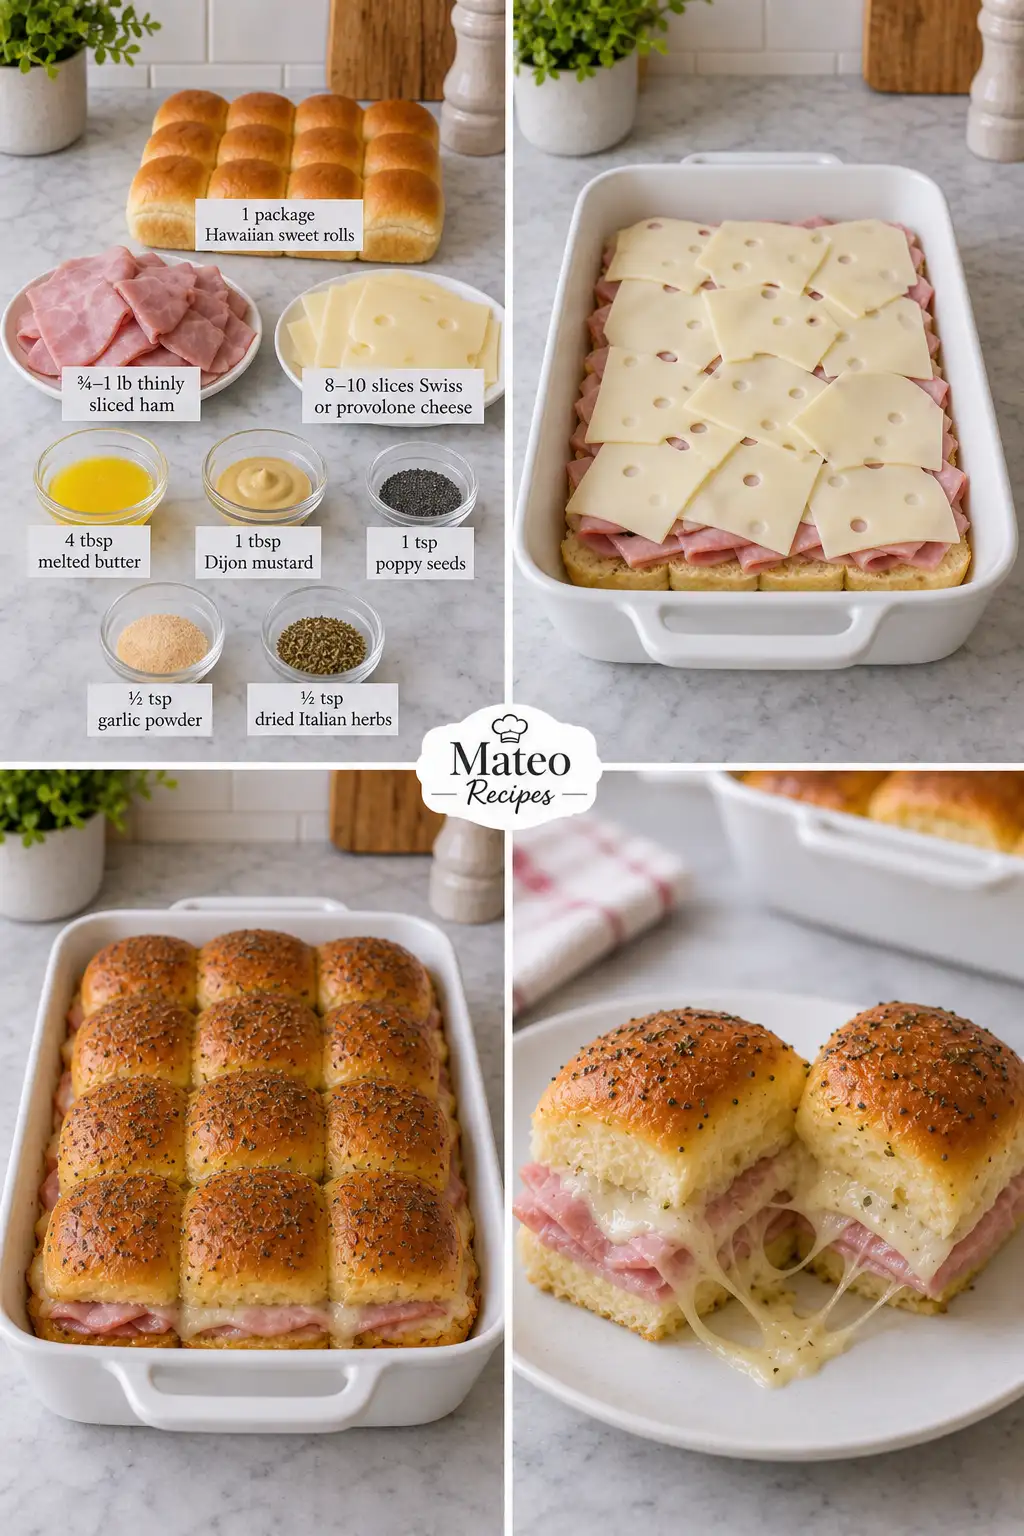
BAKED HAM & CHEESE HAWAIIAN ROLL SLIDERS are one of my favorite go-to recipes when it comes to simple, satisfying comfort food. These sliders are an absolute hit for breakfast, lunch, parties, or even a quick family dinner. Imagine sweet, buttery rolls filled with savory ham and gooey melted cheese, baked to golden perfection. Whether you’re a seasoned cook or just starting out, this recipe is easy to follow and guaranteed to impress.
If you’re interested in understanding the science behind perfecting these sliders, you might want to explore the art of baking bread to see how the rolls achieve their soft, pillowy texture. Additionally, learning about cheese melting properties can help you choose the best cheese for that perfect gooey center. These insights can elevate your cooking skills and enhance the overall experience of making these delightful sliders.
Why You’ll Love This Dish
These Baked Ham & Cheese Hawaiian Roll Sliders are more than just mini sandwiches; they’re a delightful blend of flavors and textures. Here’s why you’ll love them:
- Quick and Easy: With just 10 minutes of prep time and 25 minutes in the oven, these sliders are a breeze to make. They fit perfectly into a busy schedule or when you need something last-minute. The simplicity of the recipe means you don’t have to spend hours in the kitchen, yet you’ll still produce something that tastes like you did. Imagine coming home after a long day and whipping up a batch of these sliders without breaking a sweat. The ease of preparation means they’re accessible to cooks of all skill levels, making them a versatile addition to any recipe collection.
- Crowd-Pleaser: Perfect for gatherings, they can be served as a main dish or an appetizer. Whether it’s a birthday party, game night, or family gathering, these sliders are sure to be a hit. Guests often rave about them, and they’re one of those dishes that people will ask you to bring again. The combination of flavors caters to a wide range of palates, ensuring that everyone at your event will find something to love about these sliders. Plus, their small size makes them a convenient finger food option, easy to grab and enjoy without any fuss.
- Versatile: Suitable for any meal of the day, you can customize them with your favorite types of cheese or additional toppings. Feel free to experiment with different meats, cheeses, or even add some veggies for an extra twist. The versatility allows you to adapt this recipe according to what you have on hand. Perhaps you have some leftover turkey from the holidays or a new cheese you’ve been eager to try—this recipe welcomes your creativity. The potential combinations are endless, meaning you can craft a unique version of these sliders every time you make them.
- Kid-Friendly: The sweet rolls and melted cheese are a hit with kids, making them a great choice for family meals. They’re perfect for picky eaters and can be a fun way to get kids involved in the kitchen, whether it’s layering the ingredients or brushing on the butter topping. Imagine the joy on your child’s face as they help create a dish that the whole family will enjoy. It’s a great opportunity to introduce them to the joys of cooking and to foster a love for homemade meals.
The Recipe
For the Sliders:
| Amount | Ingredient | Notes |
|---|---|---|
| 1 package | Hawaiian sweet rolls | Soft rolls that add a sweet touch |
| 1 lb | thinly sliced ham | Choose your preferred type of ham |
| 10 slices | Swiss or provolone cheese | Provides the gooey melted cheese texture |
For the Butter Topping:
| Amount | Ingredient | Notes |
|---|---|---|
| 4 tbsp | melted butter | Adds richness and helps toppings adhere |
| 1 tbsp | Dijon mustard | Gives a tangy flavor to the sliders |
| 1 tsp | poppy seeds | Adds a slight crunch and flavor to the topping |
| 0.5 tsp | garlic powder | Enhances the flavor of the butter topping |
| 0.5 tsp | dried Italian herbs | Adds a savory herbal note |
- Slice the rolls: Cut the entire package of rolls in half horizontally without separating the individual rolls. This method keeps the sliders intact and makes the assembly process smoother. Make sure to use a sharp knife to get a clean cut. This step is crucial for maintaining the integrity of the rolls, ensuring each slider is perfectly proportioned for even baking and enjoyment.
- Layer: Place the bottom half of the rolls in a greased baking dish. Add a generous layer of ham, followed by the cheese slices. Place the top halves of the rolls back on. The layering is crucial for ensuring each bite has a perfect balance of ham and cheese. Consider adding a bit of creativity here—maybe a dash of black pepper or a sprinkle of shredded cheddar alongside the cheese slices for an extra cheesy experience.
- Make the butter topping: In a small bowl, mix the melted butter, Dijon mustard, poppy seeds, garlic powder, and dried Italian herbs. This topping is what elevates the sliders from simple to spectacular, adding flavor and texture. The aroma of the melted butter combined with Dijon mustard is irresistible, and as you brush it over the rolls, you’ll see the sliders transform into a culinary masterpiece.
- Brush & bake: Brush the seasoned butter generously over the tops of the rolls. Cover loosely with foil and bake at 350°F (175°C) for 15 minutes. Remove the foil and bake for another 5–10 minutes, until the tops are golden and the cheese is melted. The foil ensures the rolls don’t brown too quickly, while the final bake without foil gives a nice, golden finish. Watching them bake, you’ll notice the butter topping seep into the rolls, infusing them with rich, savory flavors.
- Serve: Let the sliders cool for a few minutes, then pull apart and enjoy them while they’re warm and cheesy. They are best served straight from the oven when the cheese is still oozy and the rolls are soft and buttery. The moment you bite into one, you’ll experience the delightful contrast between the crisp top and the soft, cheesy center—a true testament to the art of slider-making.
Kitchen Tools You’ll Need
| Tool | Why you need it |
|---|---|
| Baking Dish | To hold and bake the sliders evenly |
| Foil | Prevents the rolls from browning too quickly |
| Sharp Knife | For cutting the rolls horizontally without tearing |
| Mixing Bowl | To combine the butter topping ingredients |
| Pastry Brush | To apply the butter topping evenly on the rolls |
These tools are essential for ensuring the sliders come out perfectly. A good baking dish helps with even cooking, while a sharp knife is crucial for making clean cuts. The pastry brush allows for a thorough and even application of the butter topping, ensuring every roll is covered with delicious flavor. Investing in quality kitchen tools not only makes preparation easier but also enhances the overall cooking experience, turning a simple recipe into a work of art.
The Benefits of Each Ingredient
| Ingredient | What it does here |
|---|---|
| Hawaiian sweet rolls | Adds sweetness and softness to the sliders |
| Thinly sliced ham | Provides savory flavor and protein |
| Swiss/Provolone cheese | Melts to create a gooey, flavorful center |
| Butter | Adds richness and helps the topping stick |
| Dijon mustard | Introduces a tangy contrast |
| Poppy seeds | Adds texture and a subtle nutty flavor |
| Garlic powder | Enhances the overall flavor profile |
| Dried Italian herbs | Adds a touch of herbal aroma and flavor |
Each ingredient plays a pivotal role in creating the perfect slider. The sweet rolls pair beautifully with the savory ham and cheese, while the butter topping infuses each bite with extra flavor. The mustard adds a slight tang, balancing the richness, and the poppy seeds offer a subtle crunch that complements the soft rolls. Understanding the purpose of each ingredient allows you to appreciate the harmony of flavors and textures in every bite.
What to Serve With This Dish
| Idea | Why it pairs well |
|---|---|
| Fresh Fruit Salad | The lightness complements the rich sliders |
| Potato Chips | Adds a crispy, salty contrast |
| Coleslaw | The tangy, crunchy slaw balances the richness |
| Tomato Soup | Provides a classic, comforting pairing |
| Dill Pickles | Offers a sharp, tangy flavor to cut through the richness |
Pairing these sliders with the right sides elevates the meal to a complete dining experience. The fresh fruit salad adds a refreshing contrast, while potato chips and coleslaw bring in texture and balance. Tomato soup offers warmth and comfort, and dill pickles provide a zesty, palate-cleansing bite. Each accompaniment complements the sliders in unique ways, enhancing the overall satisfaction of the meal.
Storage & Leftover Tips
| Method | How long | Tip |
|---|---|---|
| Refrigerate | 3-4 days | Store in an airtight container for best freshness |
| Freeze | 1 month | Wrap individually for easy reheating |
| Reheat in Oven | 10 minutes | Use 350°F (175°C) to maintain crispness, cover with foil |
To make the most of leftovers, proper storage is key. Refrigerating in an airtight container maintains freshness, while individually wrapping sliders before freezing ensures they don’t stick together. When reheating, using the oven helps retain the original texture and flavor, making them taste just as good as fresh. Proper storage techniques ensure that you can enjoy these sliders at their best, even days later.
Make these Baked
FAQs About BAKED HAM & CHEESE HAWAIIAN ROLL SLIDERS
Can I substitute the ham with another type of meat?
Absolutely! You can use turkey or chicken slices instead of ham for a different flavor. Just ensure they’re thinly sliced for even layering.
How can I make these sliders ahead of time?
You can assemble the sliders a few hours in advance and store them covered in the refrigerator. Add the butter topping just before baking for the best texture.
Are these sliders suitable for a gluten-free diet?
To make them gluten-free, use gluten-free rolls and check that all other ingredients, like the mustard, are certified gluten-free.
Baked Ham & Cheese Hawaiian Roll Sliders
Ingredients
Equipment
Method
- Slice the rolls: Cut the entire package of rolls in half horizontally without separating the individual rolls.
- Layer: Place the bottom half in a greased baking dish. Add a generous layer of ham, followed by the cheese slices. Place the roll tops back on.
- Make the butter topping: Mix melted butter, Dijon mustard, poppy seeds, garlic powder, and dried herbs.
- Brush & bake: Brush the seasoned butter generously over the tops of the rolls. Cover loosely with foil and bake at 350°F (175°C) for 15 minutes. Remove the foil and bake another 5–10 minutes, until golden and the cheese is melted.
- Serve: Let them cool for a few minutes, then pull apart and enjoy while they’re warm and cheesy!