Mini Peanut Butter Pies: A Bite-Sized Nostalgic Delight
As a kid, I remember eagerly waiting for my mom to whip up her famous homemade pies for family gatherings. There was something magical about the way those pies seemed to bring us all together, their aroma filling the house with warmth and anticipation. Fast forward to today, and while I still cherish those memories, I’ve found a way to bottle that same joy into a smaller, more manageable treat: Mini Peanut Butter Pies. These little wonders pack a punch of flavor and are perfect for any occasion, whether it’s a cozy family dinner or a friendly neighborhood potluck. Let me take you through this delightful recipe that’s sure to become a family favorite.
Why You’ll Love This Recipe
Family-Friendly
These Mini Peanut Butter Pies are perfect for little hands and big smiles. The individual portions mean everyone gets their own, reducing the “who got the bigger slice” debates at the table. It’s a win-win situation that ensures equal portions and maximum satisfaction for all ages.
Easy to Make
Despite their fancy appearance, these pies are straightforward to prepare. With simple ingredients and clear instructions, even the most novice baker can achieve pie perfection. The step-by-step guide ensures that you won’t miss a beat, making this an ideal recipe for a relaxed afternoon in the kitchen.
Comfort Food at Its Best
There’s nothing quite like the combination of chocolate and peanut butter to evoke feelings of comfort and nostalgia. Each bite is like a warm hug, offering a delicious journey back to simpler times. The balance of flavors provides a perfect blend of sweet and savory, making these mini pies irresistible.
Versatile
These mini pies are as versatile as they come. Enjoy them as a sweet end to a family meal or bring them along to share at a gathering. They’re sure to impress with their rich flavor and elegant presentation. Whether you’re serving them at a casual brunch or a festive holiday dinner, they fit seamlessly into any occasion.
Make-Ahead Convenience
Perfect for busy schedules, you can prepare these ahead of time, making them an excellent option for entertaining without the last-minute rush. This feature is particularly convenient during holiday seasons or when hosting large gatherings, allowing you to focus on enjoying the company of your guests.
The Recipe
Ingredients
Crust:
- 2 cups all-purpose flour
- 4 tablespoons unsweetened cocoa powder
- 4 tablespoons sugar
- 1 teaspoon kosher salt
- 1 stick unsalted butter (cold)
- 4 tablespoons Crisco (vegetable shortening)
- 2 egg yolks
- 6 – 8 tablespoons iced coffee (ice water will work as well)
Filling:
- 1 cup creamy peanut butter
- 1 package (8 ounces) cream cheese (softened)
- 1 teaspoon vanilla
- 1 1/4 cup confectioners’ sugar
- 1 package (8 ounces) Cool Whip (thawed)
Topping:
- 1 cup semi-sweet chocolate chips
- 1 tablespoon Crisco
- Chopped peanuts (optional)
Directions
Crust Preparation: In a food processor, combine the flour, cocoa, sugar, and salt. Blend on low until mixed. Add the butter and Crisco, pulsing until the mixture resembles coarse crumbs. Add egg yolks and iced coffee gradually, processing with slow pulses until dough forms a ball. Begin with 5 tablespoons of iced coffee, adding more if necessary.
Chill the Dough: Divide the dough into two discs, wrap in plastic, and refrigerate for at least 30 minutes. This step is crucial as it allows the dough to rest, making it easier to handle and roll out later.
Preheat Oven: Set your oven to 350 degrees F.
Roll and Cut Dough: On a floured surface, roll out the dough to about 1/8 inch thick. Use a 3-inch flower-shaped cookie cutter. Reroll scraps to maximize dough usage. This creative step adds an aesthetic touch to your pies, making them visually appealing.
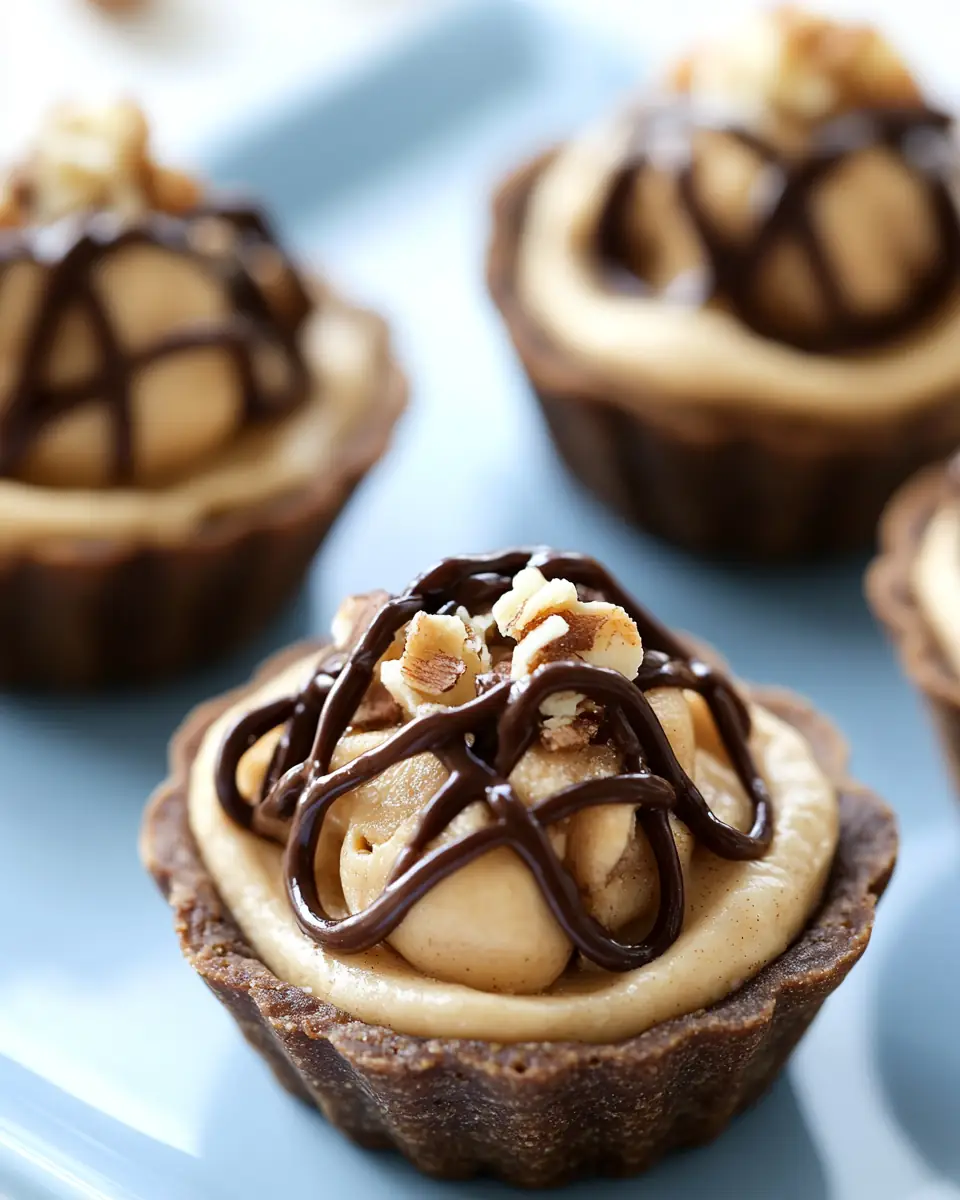
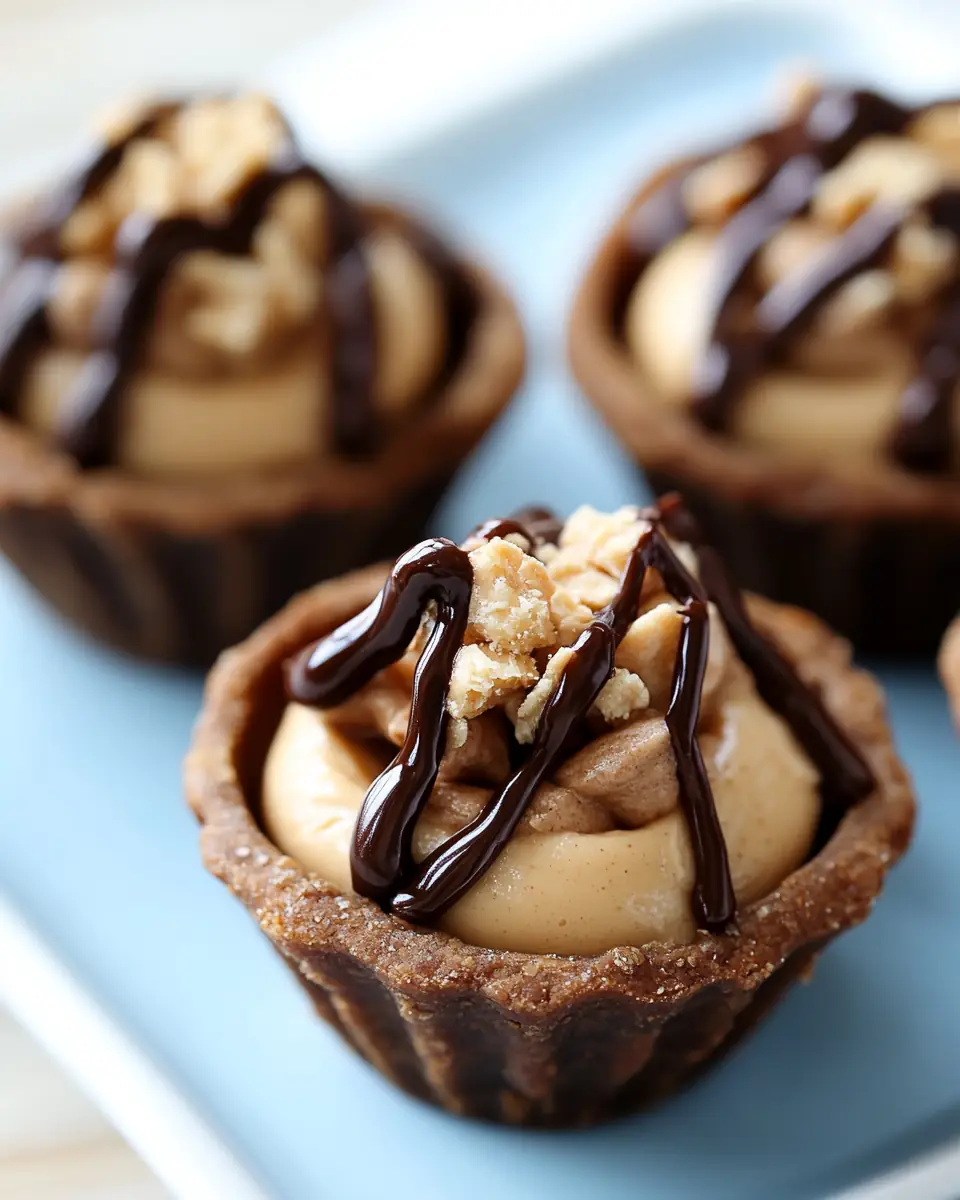
Form Pie Shells: Press the flower shapes into an ungreased mini muffin pan. Bake for 12-15 minutes at 350 degrees F. The shells should be firm to the touch but not overbaked, as they will continue to cook slightly as they cool.
Cool and Fill: Let the shells cool completely in the pan. For filling, beat peanut butter, cream cheese, and vanilla until smooth. Incorporate powdered sugar, then Cool Whip, beating until smooth. Pipe into cooled shells. The fluffy filling is the heart of these pies, providing a creamy contrast to the crunchy shell.
Chocolate Drizzle: Melt chocolate chips with Crisco in a microwavable bowl or double boiler. Cool slightly, transfer to a bag, snip a corner, and drizzle over pies. Top with chopped peanuts if desired. This final touch adds a layer of sophistication and enhances the overall flavor profile.
Kitchen Tools You’ll Need
- Food Processor: Essential for creating the perfect dough texture. It ensures the ingredients are well-combined, leading to a consistent and reliable crust.
- Rolling Pin: To roll out your dough evenly. A good rolling pin helps achieve the desired thickness without tearing the dough.
- Cookie Cutter: A flower-shaped cutter adds a charming touch, making your mini pies stand out at any gathering.
- Mini Muffin Pan: Crucial for shaping those adorable mini pie shells. Its non-stick surface makes removal easy and hassle-free.
- Piping Bag: Or a large plastic bag to neatly fill the pie shells. This tool ensures precision and cleanliness, making the filling process straightforward.
- Microwavable Bowl: Ideal for melting chocolate with ease, ensuring a smooth and glossy finish for your drizzle.
The Benefits of Each Ingredient
- All-Purpose Flour: Provides structure and stability to your pie crust, ensuring it holds its shape well.
- Cocoa Powder: Adds a rich chocolate flavor to the crust, perfectly complementing the peanut butter filling with its depth and complexity.
- Sugar: Balances the flavors and adds a touch of sweetness, crucial for the overall taste profile.
- Butter and Crisco: Create a flaky, tender crust by incorporating air pockets, a hallmark of any great pastry.
- Egg Yolks: Contribute to the dough’s richness and binding properties, adding to its overall texture and flavor.
- Iced Coffee: Enhances the flavor profile and helps bind the dough, offering a subtle depth that elevates the crust.
- Peanut Butter: The star of the show, offering creamy, nutty goodness that is both familiar and comforting.
- Cream Cheese: Adds tanginess and creaminess to the filling, balancing the sweetness and enhancing the texture.
- Vanilla: Elevates the overall flavor with its warm, sweet notes, adding a layer of complexity to the filling.
- Confectioners’ Sugar: Sweetens the filling without grittiness, ensuring a smooth and pleasant texture.
- Cool Whip: Provides a light, airy texture to the filling, making it luscious and easy to work with.
- Semi-Sweet Chocolate Chips and Crisco: Create a smooth, glossy drizzle that adds both visual appeal and a rich flavor contrast.
What to Serve With This Dish
Mini Peanut Butter Pies are delightful on their own, but if you’re looking to create a full dessert spread, consider pairing them with a fresh fruit salad or a light vanilla ice cream. The freshness of the fruit complements the richness of the pies, while the ice cream adds an additional creamy texture. For a complete meal, you might start with a hearty main like my Classic Meatloaf or the comforting Chicken Pot Pie, both recipes that emphasize the joy of family dining.
Storage & Leftover Tips
These mini delights are best enjoyed fresh, but if you have leftovers, they store well too. Keep them in an airtight container in the refrigerator for up to three days to maintain their freshness. If you plan to make them ahead, you can prepare the pie shells and filling separately. Assemble them a few hours before serving for the best texture and flavor. Avoid freezing, as the filling can become grainy, which would compromise the delightful creaminess of each bite.
Tips for Success
Proper Chilling: Ensure the dough is thoroughly chilled before rolling. This helps in maintaining the structure and prevents the dough from sticking.
Measuring Ingredients: Accurate measurements are key to achieving the right consistency, especially for the crust.
Handling the Dough: Be gentle when rolling and cutting the dough. Overworking it can lead to a tough crust.
Filling Consistency: Ensure the filling is smooth and well-mixed for the best texture. Any lumps can affect the final taste and appearance.
Decorative Drizzle: If you’re feeling creative, use a fork or a spoon for an artistic drizzle of chocolate over each pie.
Conclusion
As you embark on this baking adventure, remember that cooking is not just about feeding the body, but also about nourishing the soul and bringing people together. These Mini Peanut Butter Pies are more than just a sweet treat; they’re a way to create lasting memories with the ones you love. Enjoy the process, savor the moments, and delight in the smiles of those who share in your culinary creations. Happy baking!
Mini Peanut Butter Pies
Ingredients
Equipment
Method
- In a food processor, combine flour, cocoa, sugar, and salt on low until blended. Add butter and Crisco, pulse until mixture resembles coarse crumbles. Add egg yolks and iced coffee, process with slow pulses until dough forms a ball. Start with 5 tbsp iced coffee, adding more if needed.
- Press dough into two flattened discs. Wrap in plastic, refrigerate for at least 30 minutes.
- Preheat oven to 350°F. On a floured surface, roll out dough to 1/8 inch thick. Cut dough with a flower shaped cookie cutter. Press flowers into an ungreased mini muffin pan. Bake at 350°F for 12-15 minutes.
- Allow mini pie shells to cool completely in the pan before removing to ensure they keep their shape.
- For the filling, beat peanut butter with cream cheese and vanilla until smooth. Add powdered sugar, beat until smooth, then add Cool Whip and beat until smooth.
- Pipe filling into cooled chocolate pie shells using a piping bag or a large plastic bag.
- For the drizzle, melt chocolate chips and shortening in a microwavable bowl or double boiler. Cool slightly, transfer to a plastic bag, snip corner, and drizzle over filled pie shells. Top with chopped peanuts if desired.