
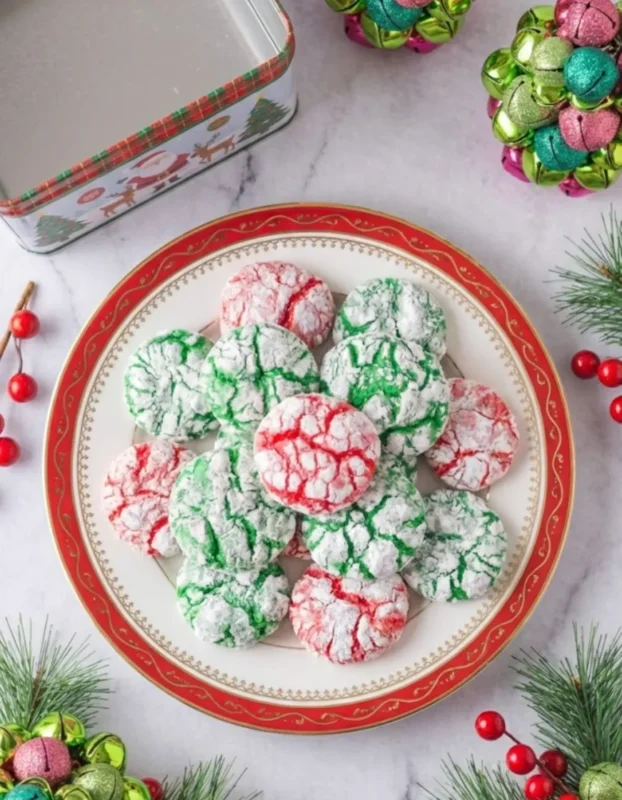
Every Christmas, my kitchen transforms into a winter wonderland of baking, and these festive crinkle cookies have become the highlight. The first time I made them, I was amazed at how something so simple could look so stunning. The bright red and green colors covered in snowy white powdered sugar are like little edible ornaments. My kids love helping roll the dough balls in sugar, and guests always think they took hours to make. The secret? They start with a cake mix and come together in just 20 minutes.
These cookies are the perfect combination of beautiful and easy. The crackled surface creates that classic crinkle cookie look, while the soft, cake-like texture makes them incredibly tender. Using cake mix means consistent results every time, with no complicated measuring or creaming butter. Whether you’re making them for cookie exchanges, holiday parties, or just to spread some Christmas cheer, these colorful treats deliver maximum impact with minimal effort.
Why You’ll Love This Recipe
- Ready in just 20 minutes from start to finish
- Only 5 ingredients needed
- Starts with convenient cake mix for foolproof results
- Festive red and green colors perfect for Christmas
- Soft, tender, cake-like texture
- Beautiful crinkled appearance looks professionally made
- Makes about 24 cookies
- Fun activity for baking with kids
Ingredients You’ll Need
- 1 white cake mix (13.25 oz) – Use plain white cake mix, not French vanilla or other flavored varieties
- 2 large eggs – Bind the dough and add moisture
- ⅓ cup olive oil – Can also use vegetable oil or melted coconut oil
- ⅓ cup powdered sugar – For rolling and creating the snowy coating
- Red food coloring – Gel food coloring gives more vibrant color than liquid
- Green food coloring – Gel food coloring recommended for best results
Important: Use gel food coloring instead of liquid if possible. Gel gives more vibrant colors without thinning the dough. Also, mix the dough by hand rather than with an electric mixer to prevent it from becoming too thick and difficult to work with.
Step-by-Step Instructions
- Preheat oven: Preheat your oven to 375°F (190°C).
- Prepare baking sheets: Line baking sheets with parchment paper, silicone baking mats, or coat lightly with nonstick spray.
- Make the dough: In a large mixing bowl, combine cake mix, eggs, and olive oil. Mix by hand with a wooden spoon or spatula until fully incorporated. Avoid using electric mixers as they can make the dough overly thick.
- Divide the dough: Split the dough evenly into two separate bowls.
- Color the dough: Add red food coloring to one bowl and green food coloring to the other. Use different toothpicks or spoons for each color to avoid mixing. Stir each bowl until the color is vibrant and evenly distributed throughout the dough.
- Form dough balls: Using a small cookie scoop (about 1½ tablespoons), scoop portions of dough and roll into balls with your hands.
- Coat in sugar: Place powdered sugar in a shallow bowl. Roll each dough ball generously in the powdered sugar until completely coated. Don’t be shy with the sugar—you want a thick coating for the best crinkle effect.
- Arrange on sheet: Place coated dough balls on prepared baking sheets, leaving about 1½ inches between cookies to allow for spreading.
- Bake: Bake for 9-12 minutes, until the tops crackle and the cookies are set. The cookies should still be soft in the center.
- Cool: Let cookies cool on the baking sheet for 2 minutes to set, then carefully transfer to a cooling rack to finish cooling completely.
Tips for Success
Use gel food coloring: Gel or paste food coloring is much more concentrated than liquid, giving you vibrant colors without adding extra moisture to the dough.
Don’t skimp on powdered sugar: A generous coating of powdered sugar is essential for creating those beautiful cracks. Roll the balls thoroughly.
Mix by hand: Using an electric mixer can overwork the dough and make it too thick. A wooden spoon or spatula works perfectly.
Watch the baking time: These cookies bake quickly. Check at 9 minutes, especially if you made smaller cookies. Overbaking makes them dry.
Cool before moving: Let cookies sit on the hot baking sheet for 2 minutes before transferring. They’re very delicate when hot.
Make them ahead: These cookies actually taste better the next day as the flavors develop and the texture becomes even softer.
Variations
- Three-color version: Divide dough into thirds and add white (uncolored), red, and green for variety
- Peppermint crinkles: Add ½ teaspoon peppermint extract to the dough for minty flavor
- Chocolate base: Use chocolate cake mix instead of white for chocolate crinkle cookies
- Lemon flavor: Add 1 teaspoon lemon extract for a subtle citrus note
- Sprinkle addition: Press a few festive sprinkles into the top before baking
- Different colors: Use blue and white for Hanukkah, or pastels for Easter
- Funfetti style: Use funfetti cake mix for built-in sprinkles
Storage
Room temperature: Store in an airtight container at room temperature for up to 5 days. Place parchment paper between layers to prevent the powdered sugar from rubbing off.
Refrigerator: These don’t need refrigeration but can be stored in the fridge for up to 1 week if preferred.
Freezer – Baked cookies: Freeze in a single layer, then transfer to freezer bags for up to 3 months. Thaw at room temperature. You may need to dust with additional powdered sugar after thawing.
Freezer – Cookie dough: Roll dough balls in sugar and freeze on a baking sheet. Transfer to freezer bags and freeze for up to 3 months. Bake directly from frozen, adding 1-2 minutes to baking time.
Frequently Asked Questions
Can I use a different flavor of cake mix?
Yes! Chocolate, yellow, or funfetti cake mix all work. Just know that white cake mix creates the most vibrant red and green colors.
Why didn’t my cookies crackle?
You may not have used enough powdered sugar, or you overbaked them. Make sure to coat generously and don’t bake beyond 12 minutes.
Can I use vegetable oil instead of olive oil?
Absolutely! Any neutral oil works—vegetable, canola, or melted coconut oil are all fine substitutes.
My dough is too sticky. What do I do?
Refrigerate the dough for 15-20 minutes to firm it up, or add 2-3 tablespoons more cake mix.
Can I make these with butter instead of oil?
Oil works best for the soft, tender texture. Butter will make the cookies spread more and have a different texture.
Why are my colors not vibrant?
You need more food coloring. Gel food coloring gives the most vibrant results. Add more drops until you achieve the brightness you want.
How do I prevent the colors from mixing?
Use separate utensils for each color, and wash your hands between handling red and green dough.
Final Thoughts
These Christmas Crinkle Cookies are the perfect holiday baking project when you want maximum visual impact with minimal effort. The festive red and green colors immediately say “Christmas,” while the crackled powdered sugar coating gives them that classic bakery appearance. What makes them truly special is how deceptively simple they are—starting with cake mix eliminates most of the measuring and guesswork, yet the results look like you spent hours decorating.
These cookies are wonderful for baking with children since the process is straightforward and fun, especially the rolling in powdered sugar. They’re also perfect for gifting, cookie exchanges, or simply adding festive cheer to your holiday table. Make a batch and watch them brighten up any Christmas celebration. Just be prepared—their cheerful appearance and soft, tender texture mean they disappear quickly!